Sharing Data With SSHFS
Note: This tutorial can be tried interactively on: https://katacoda.com/dashohoxha/courses/misc/sharing-data-with-sshfs
Introduction
If a distributed team needs to share the same data among its members, a common approach is to use some kind of data storage, like those offered by Amazon S3, Google Cloud Storage, Azure Blob Storage, IBM Cloud Object Storage, HDFS, etc. If the data are not too big, you may also use Google Drive, DropBox, etc. to synchronize with a single account.
There are also free applications that can be installed on your own server, like:
For a more comprehensive (but not ultimate) list of the available options see https://rclone.org/#providers
However another approach is to mount a remote directory on all the members of the team. This can be done with a network filesystem (like NFS, SMBFS, SSHFS, etc.), or with some distributed filesystem.
In this tutorial we will see how to share data with the help of SSHFS, which is really easy to setup and convenient. All the members of the team (2 in our example) will mount through SSHFS the same directory from a central server, as shown in the following diagram:
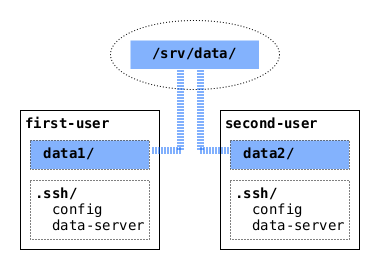
Figure 1: Sharing Data With SSHFS
Step 1 - Setup the central server
In this step we are going to setup the server. In the following steps we will do the setup for the first user and the second user.
Create user accounts. For each user that needs to access the central repo we will create an account on the server. Let's assume that we have two users and their accounts are named
user1anduser2.useradd -m -s /bin/bash user1 echo user1:pass1 | chpasswd useradd -m -s /bin/bash user2 echo user2:pass2 | chpasswd
Add the users to the same group, in order to manage their permissions:
addgroup data
adduser user1 data
adduser user2 data
Create a directory for the data storage and set proper permissions to it:
mkdir -p /srv/data
chgrp -R data /srv/data/
chmod -R g+rw /srv/data/
chmod -R g+s /srv/data/
Notice the
setgidpermission that we set on thedata/dir. Because of it, the new sub-directories or files that are created in it will have the same group as thedata/dir itself. This is convenient for a group of users that use the same directory.
Step 2 - First user setup
For the sake of example, the first user is named first-user. He
is going to use the account user1 on the server.
The following steps should be done on the computer of the first user.
Set up the ssh config for the central data server:
mkdir ~/.ssh
chmod 700 ~/.ssh/
SSH client configurations are usually kept on the directory
~/.ssh/, and it should be accessible only by the owner.cat <<EOF >> ~/.ssh/config Host data-server HostName data.example.org User user1 IdentityFile ~/.ssh/data-server IdentitiesOnly yes EOFIn this configuration entry we describe the details for the Host named
data-server(which is an arbitrary name that we choose). The HostName in this case is an example FQDN, but can also be the IP of the server.The User account on the server is
user1, and we will login there with an SSH key (IdentityFile) that is located at~/.ssh/data-server.The SSH key above doesn't exist yet, so let's create it:
ssh-keygen -t rsa -q -N '' -f ~/.ssh/data-server
The option
-N ''tells the command to use no passphrase for encrypting the private key, and-f ~/.ssh/data-servergives it the filename where the key should be saved.In order to be able to login to the server with this key, we need to send the public part of it to the server:
ssh-copy-id -i ~/.ssh/data-server.pub data-server
Now let's try to ssh to the server with the new key (should be able to do it without a password):
ssh data-server ls -al .ssh/
ssh data-server cat .ssh/authorized_keys
The command
ls -al .ssh/is running on the server, through ssh.Notice that the public key that we sent to the server has been appended to
.ssh/authorized_keyson the home directory ofuser1.Now that we configured an SSH connection to the server, let's mount with
sshfsthe data directory from the serverapt install sshfs # making sure that sshfs is installed mkdir -p data1 sshfs data-server:/srv/data data1 df -h data1/
Step 3 - Second user setup
The setup for the second user is similar to the first one. The following steps should be done on the computer of the second user.
Set up the ssh config for the central data server:
mkdir ~/.ssh
chmod 700 ~/.ssh/
cat <<EOF >> ~/.ssh/config
Host data-server
    HostName data.example.org
    User user2
    IdentityFile ~/.ssh/data-server
    IdentitiesOnly yes
EOF
Create an SSH key with the filename (
~/.ssh/data-server) that we used above:ssh-keygen -t rsa -q -N '' -f ~/.ssh/data-server
Send the public key to the server:
ssh-copy-id -i ~/.ssh/data-server.pub data-server
Now try to ssh to the server with the new key (should be able to do it without a password):
ssh data-server ls -al .ssh/
ssh data-server cat .ssh/authorized_keys
Mount with
sshfsthe data directory from the serverapt install sshfs # making sure that sshfs is installed mkdir -p data2 sshfs data-server:/srv/data data2 df -h data2/
Step 4 - Sharing Data
With this setup we can share data by using the central data storage as a mediator.
From the home of the second user create a data file:
fallocate -l 1G datafile
mv datafile data2/
Check the data directory on the server:
ls -l /srv/data/
The datafile that we placed on
data2/of the second user, has already been transferred to the server, because that is a mounted remote directory.Check the
data1/on the home of the first user:ls -al data1/
This one is as well a mounted remote directory, so whatever is on the server is available here.
Step 5 - Automount
In the previous steps we have mounted the remote storage manually
with the command sshfs. In some cases it might be nice to mount
it automatically, so let's see how to do this.
First, unmount the directories that we mounted previously with
sshfs:fusermount -u ~/data1/ fusermount -u ~/data2/
- Mount the data directory for the first user:
Let's do a manual login first, so that the fingerprint of the data server is added on the list of known hosts of the root user:
sudo su
ssh user1@data.example.org \
    -i ~first-user/.ssh/data-server
Then get the
uidandgidof the first user:su - first-user -c id
Add an entry on
/etc/fstab:cat << EOF >> /etc/fstab user1@data.example.org:/srv/data /home/first-user/data1 fuse.sshfs noauto,x-systemd.automount,_netdev,user,idmap=user,follow_symlinks, identityfile=/home/first-user/.ssh/data-server, allow_other,default_permissions,uid=1001,gid=1001 0 0 EOFAttention: The code above must all be in a single line, but is broken for readability
Finally, setup systemctl:
systemctl daemon-reload
systemctl list-unit-files --type automount
systemctl restart 'home-first\x2duser-data1.automount'
systemctl status 'home-first\x2duser-data1.automount'
- Do the same thing for the second user.