Using WireGuard VPN
Table of Contents
1. Introduction
WireGuard is a simple, fast and modern VPN that utilizes state-of-the-art cryptography. It is quite flexible and can be used in many situations.
In this article we will see how to install a WireGuard server with Docker and docker-scripts, and some of the usecases that are supported by it (which hopefully are the most important ones).
These scripts are meant to install WireGuard on a server with a public IP (for example a VPS on the cloud), and to generate and offer configurations to clients that don't have a public IP (are behind NAT).
Some of the usecases supported by this server are:
- Securing connections to the Internet
- Creating a Virtual Private LAN
- Routing between remote private LANs
- Accessing clients from a cloud server
2. Installing and using a WireGuard server
2.1. Install Docker and docker-scripts
Installation of the WireGuard server is based on Docker and docker-scripts, so let's install these first.
Install Docker:
curl -fsSL https://get.docker.com -o get-docker.sh
sudo sh get-docker.sh
Install docker-scripts:
apt install git make m4
git clone https://gitlab.com/docker-scripts/ds /opt/docker-scripts/ds
cd /opt/docker-scripts/ds/
make install
2.2. Install the WireGuard container
Get the scripts and initialize a directory for the container:
ds pull wireguard
ds init wireguard @wireguard
cd /var/ds/wireguard/
- Edit
settings.shand make sure that the values of the settings are right. We will see later what are the right settings for each case. - Run
ds maketo build, create and configure the container.
2.3. Create client configurations
ds client add client1 192.168.100.1
ds client add client2 192.168.100.2
ds client add client3 10.0.0.3
ds client add client4 10.0.0.4 192.168.1.0/24
ds client ls
ls clients/
Notice that:
- IPs of the clients don't have to be on the same network.
- Besides the client name and the client IP we can also give a network as a third argument. We will see later when and why this is needed.
- The configuration files of the clients are saved on the directory
clients/.
2.4. Send configuration files to each client
There are several ways to do it:
Using a QR code (useful if the client is your smartphone):
ds share qr client1
Using Tor:
ds share tor client2
Use a Tor Browser on the client side to download this configuration file.
Using https:
ds share www client3
ds share www client4
ls www/
On the client side use a command like this to get the config file:
wget --no-check-certificate -O client3.conf \
  https://11.12.13.14:4343/clients/client3.conf.HjamzWEpWW6z4LT
To stop sharing by www run:
ds share www stop
2.5. Start the VPN connection on the clients
On each client do these:
Install WireGuard. For example, if it is Debian/Ubuntu install it like this:
apt install wireguard
If the client is a RaspberryPi, you also have to install
raspberrypi-kernel-headersand then reboot:apt install raspberrypi-kernel-headers reboot
Test the configuration file:
wg-quick up ./client1.conf

ip addr
ping 8.8.8.8
traceroute 8.8.8.8
curl ifconfig.co

wg-quick down ./test2.conf
Start the VPN connection as a service:
mv client1.conf /etc/wireguard/wg0.conf

systemctl enable wg-quick@wg0
systemctl start wg-quick@wg0
systemctl status wg-quick@wg0

ip addr
ping 8.8.8.8
traceroute 8.8.8.8
curl ifconfig.co
3. Usecase #1: Secure connection to the Internet
This is maybe the most popular reason why people want to use a VPN. If you are connected to an unknown WiFi hotspot (one that it is not under your control), it is quite possible that someone may try to eavesdrop your communications, and maybe try to hack you. The recommended solution is to use a VPN for connecting to the Internet.
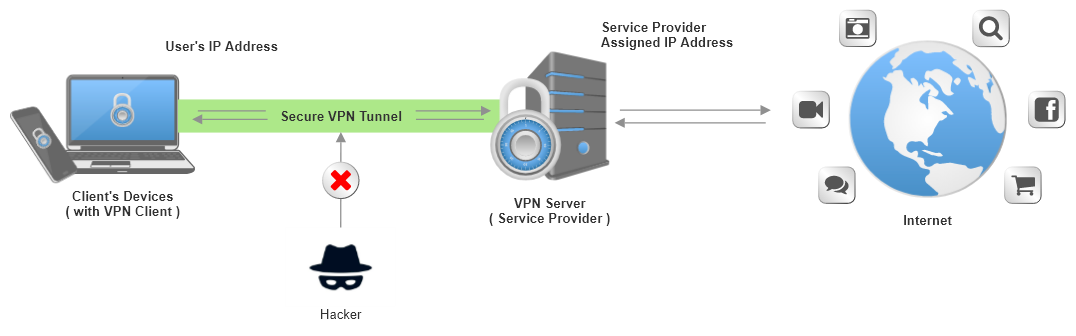
Figure 1: A VPN tunnel to the internet
For this case the settings should be like this:
ROUTED_NETWORKS="0.0.0.0/0"
DNS_SERVERS="176.103.130.130, 176.103.130.131"
ALLOW_INTERNET_ACCESS=yes
CLIENT_TO_CLIENT=no
KEEPALIVE_PERIOD=0
By the way, these are the default values on settings.sh.
Let's discuss their meaning:
- The setting
ROUTED_NETWORKS="0.0.0.0/0"tells the client to route everything to the wireguard interface (wg0). So, all the internet traffic will go through the WG tunnel. DNS_SERVERS="176.103.130.130, 176.103.130.131"tells the client which DNS servers to use. You can use your preferred DNS servers here. The client can also change his configuration file and customize the DNS servers.When
ALLOW_INTERNET_ACCESS=yesthen these firewall rules will be added on the server:iptables -I FORWARD -i wg0 -j ACCEPT iptables -t nat -I POSTROUTING -o eth0 -j MASQUERADE
This allows the WG server to behave as a NAT server for the clients, providing them access to internet.
The setting
CLIENT_TO_CLIENT=notells the server to block the connections between the clients. This is achieved with a firewall rule like this:iptables -I FORWARD -i wg0 -o wg0 -j DROP
This is what you usually want when using VPN for secure access to the Internet. However if all the clients belong to you, and you would prefer them to be able to access each-other, then change it to
CLIENT_TO_CLIENT=yes.The setting
KEEPALIVE_PERIODmakes the client to send periodically a packet to the server.WG by default sends data only when there is anything to send. When client sends no data for some time, the NAT (behind which the client is) terminates the session, and the connection to the server (and to the other clients) is lost. Usually this is fine, because the connection will be established again when the client needs to access the internet. So, the setting
KEEPALIVE_PERIOD=0(which disables the keepalive feature) is OK.However, if the clients want to communicate with each-other (setting
CLIENT_TO_CLIENT=yesabove), it is important that each client keeps the connection to the server alive, so that it can be reached by the other clients when they want to access it. In this case,25seconds is a good value forKEEPALIVE_PERIOD.
For testing this usecase see:
4. Usecase #2: Virtual Private LAN
In this case there are several computers distributed all over the internet, and we want them to communicate with each-other safely and securely, as if they are in a private LAN.
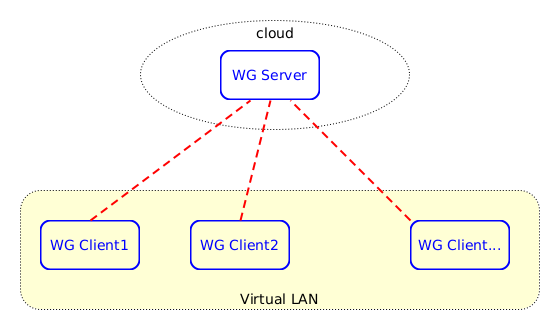
Figure 2: Virtual Private LAN
This is an important usecase that facilitates remote collaboration of distributed teams, remote education, etc.
The settings for this case should be like this:
ROUTED_NETWORKS="192.168.10.0/24"
ALLOW_INTERNET_ACCESS=no
CLIENT_TO_CLIENT=yes
KEEPALIVE_PERIOD=25
- The first setting will tell the clients to route the traffic for
192.168.10.0/24through the WG interface. All the rest of the traffic will go through the normal gateway. - The setting
ALLOW_INTERNET_ACCESS=notells the server to block the internet access from the clients. So, even if the clients change manually the first setting on their configuration toAllowedIPs = 0.0.0.0/0, trying to route everything through the WG interface, they still will not be able to have internet access. - The third setting makes sure that the clients can
pingand access each-other (otherwise it wouldn't be a virtual LAN). - The last setting tells the clients to send a keep-connection-alive package every 25 seconds. This prevents the NAT sessions from expiring and makes sure that each client can be accessed from the other clients at any time.
For testing this usecase see: Test #4: Virtual private LAN
An example of this usecase is also described in this article: Distributed Computer Lab
5. Usecase #3: Routing between remote private LANs
This case is an extension of the second case above, in the sense that not only the WG clients can communicate with each-other, but also the other clients on their LANs can communicate with each-other.
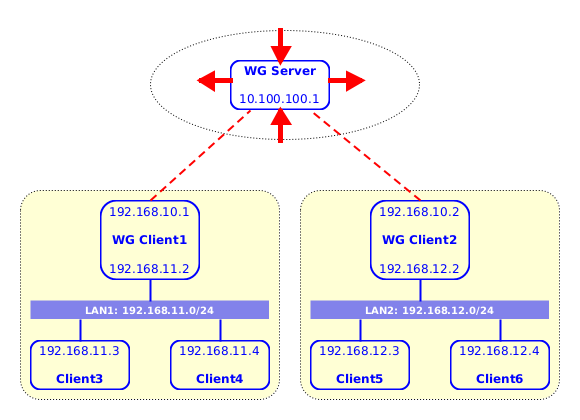
Figure 4: Routing between remote private LANs
For example from Client3 and Client4 we can ping to Client5 and Client6 (and the other way around), with the network traffic being routed safely through WG clients and the WG server.
This usecase might be useful for companies that have branches on remote locations. When the number of computers to be connected is big and dynamic (new computers may be added frequently), routing between two LANs is more practical than making each computer a WG client.
The steps to setup this case are these:
Edit
settings.shlike this:ROUTED_NETWORKS="192.168.11.0/24, 192.168.12.0/24" ALLOW_INTERNET_ACCESS=no CLIENT_TO_CLIENT=yes KEEPALIVE_PERIOD=25
ROUTED_NETWORKSshould contain at least all the LANs that will be connected, but you may also add10.100.100.1/32(the IP of the WG server),192.168.10.0/24(the network of the WG clients), etc.When adding client configurations on the server, give also the LAN that is going to use this client as a gateway, like this:
ds client add client1 192.168.10.1 192.168.11.0/24
ds client add client2 192.168.10.2 192.168.12.0/24
This will tell the WG server to allow the traffic from these networks.
We also need to add proper routes to Client3, Client4, Client5, Client6, etc. For example, on Client3 we should add this route:
ip route add to 192.168.12.0/24 via 192.168.11.2
On Client5 we should add a route like this:
ip route add to 192.168.11.0/24 via 192.168.12.2
For testing this usecase see: Test #5: Routing between two LANs
5.1. A simpler setup for Usecase#3
Another way, a bit more convenient, might be to use the command ds
setup router, like this:
ds setup router \
client1:192.168.10.1:192.168.11.0/24 \
client2:192.168.10.2:192.168.12.0/24
This will both modify settings.sh with the right value of
ROUTED_NETWORKS (and other proper settings), and will create the
client configurations as above.
However you still need to add the routes to the non-WG clients, as shown above.
5.2. An alternative configuration for Usecase#3
If we want all the clients to access the internet through the WG server (besides accessing each-other), then the setup should be like this:
Edit
settings.shlike this:ROUTED_NETWORKS="0.0.0.0/0" ALLOW_INTERNET_ACCESS=yes CLIENT_TO_CLIENT=yes KEEPALIVE_PERIOD=25
Create client configurations like this:
ds client add client1 192.168.10.1 192.168.11.0/24
ds client add client2 192.168.10.2 192.168.12.0/24
Add default routes to clients, like this:
# on Client3 and Client4
ip route add to default via 192.168.11.2

# on Client5 and Client6
ip route add to default via 192.168.12.2
6. Usecase #4: Accessing clients from a cloud server
In this case we want the clients and a containerized application on the cloud to be able to access each-other, but the clients themselves should not be able to access each-other. This situation is represented on the diagram:
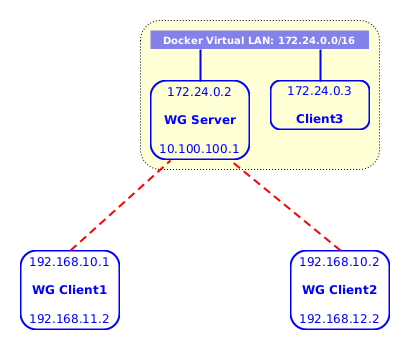
Figure 5: Accessing clients from a cloud server
This case might be useful if we have for example a containerized Guacamole server (on Client3) and want to access from it some machines that are located on private networks (Client1 and Client2).
The steps to setup this case are these:
Edit
settings.shlike this:ROUTED_NETWORKS="172.24.0.0/16" ALLOW_INTERNET_ACCESS=no CLIENT_TO_CLIENT=no KEEPALIVE_PERIOD=25
ROUTED_NETWORKScontains the docker LAN where the WG container and the Guacamole container are located.Create client configurations on the server:
ds client add client1 192.168.10.1
ds client add client2 192.168.10.2
So far Client1 and Client2 can ping to Client3 (
172.24.0.3), but Client3 cannot ping back to them (to192.168.10.1and to192.168.10.2). In order to fix this, add this route to Client3:ip route add to 192.168.10.0/24 via 172.24.0.2
Note also that Client1 and Client2 cannot ping to each-other or the WG
server, and this is ensured by the setting CLIENT_TO_CLIENT=no.
6.1. Usecase #4.1: Accessing LANs as well from a cloud server
Sometimes it may be more convenient to access from the server the LANs behind the WG clients as well. For example in the following diagram we want Client3 and Client4 to be able to access each-other:
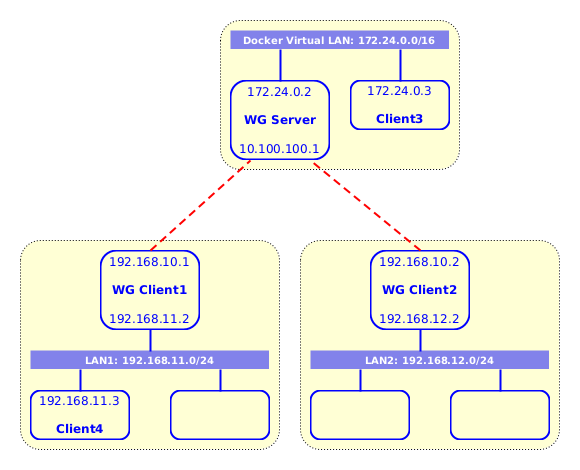
Figure 6: Accessing LANs from a cloud server
The setup for this case is almost the same as with the previous case, with these small modifications:
When creating clients we also give the LANs that should be allowed by the WG server, like this:
ds client add client1 192.168.10.1 192.168.11.0/24
ds client add client2 192.168.10.2 192.168.12.0/24
On Client3 we should add these routes as well:
ip route add to 192.168.11.0/24 via 172.24.0.2
ip route add to 192.168.12.0/24 via 172.24.0.2
On Client4 (and similarly to the other LAN clients) we should add a route like this:
ip route add to 172.24.0.0/16 via 192.168.11.2
For testing this usecase see: Test #6: Accessing clients from a cloud server
An example of this usecase is also described in this article: Accessing Computer Labs Remotely