Distributed Computer Lab
Table of Contents
1. Introduction
With COVID-19 pandemic, most of the schools and universities around the world have to do the teaching from home. In such conditions, being able to devise a virtual computer lab, where each student (with his laptop) participates remotely from home, might be quite useful. In this article we will see how to set it up with Epoptes, WireGuard VPN, and a VPS on the cloud.
It looks like this:
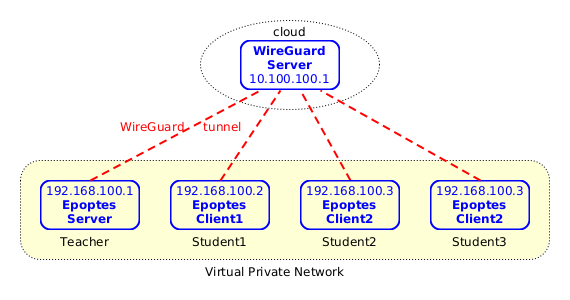
Figure 1: Virtual Private Network
- The teacher and the students connect to the internet from home, and they don't need to have a public IP.
- Each student and the teacher have set up a tunnel with the WireGuard server, which is located somewhere on the cloud and has a public IP.
- The WireGuard server and the WireGuard clients are configured such that they create a virtual private network, where each computer can connect to the others safely and securely through the WireGuard tunnels.
- The teacher has installed an Epoptes server, and the students have installed Epoptes clients. So, the teacher can see what each student is doing and can help them if needed.
2. Install the WireGuard server
We will install the WireGuard server with the help of Docker and docker-scripts so let's install them first:
### install docker
curl -fsSL https://get.docker.com -o get-docker.sh
sudo sh get-docker.sh

### install docker-scripts
apt install git make m4
git clone https://gitlab.com/docker-scripts/ds /opt/docker-scripts/ds
cd /opt/docker-scripts/ds/
make install
Now let's install the WireGuard container with docker-scripts:
Get the scripts and initialize a directory for the container:
ds pull wireguard
ds init wireguard @wireguard
cd /var/ds/wireguard/
Edit
settings.shand make sure to change these settings:ROUTED_NETWORKS="10.100.100.1, 192.168.100.0/24" ALLOW_INTERNET_ACCESS=no CLIENT_TO_CLIENT=yes KEEPALIVE_PERIOD=25
Here,
10.100.100.1is the IP of the WG interface on the WireGuard container and192.168.100.0/24is the subnet that we are going to use for the VPN. WireGuard clients will route the traffic to this network through the WireGuard interface (and the rest of the traffic will go via the normal gateway).ALLOW_INTERNET_ACCESSis set tonobecause we don't want the WG clients to access the internet through the WG server (this might be useful on some other cases, but not in this one), andCLIENT_TO_CLIENTis set toyesso that the WG server allows the WG clients to communicate with each-other.The last setting tells the clients to send a keep-connection-alive package every 25 seconds. This prevents the NAT sessions of the clients from expiring and makes sure that each client can be accessed from the others at any time.
For more details about these settings and their meanings see also the WireGuard Usecases.
Finally run
ds maketo build, create and configure the container.ds make
3. Setup WireGuard clients
On the WG server, let's add configurations for each WG client:
cd /var/ds/wireguard/
ds client add teacher 192.168.100.1
ds client add student1 192.168.100.2
ds client add student2 192.168.100.3
ds client add student3 192.168.100.4
ds client ls
ls clients/
Send these configuration files to the clients. One way of doing it is to share them by HTTPS, with the command
ds share www:ds share www teacher ds share www student1 ds share www student2 ds share www student3 ls www/
Then, each client can get the configuration file like this:
wget --no-check-certificate -O student1.conf \
     https://12.34.56.78:10443/clients/student1.conf.rUZo4wu7VRFlU6L
On each client (teacher and students), install WireGuard. Assuming that you are using Debian/Ubuntu, you can do it like this:
apt install wireguard
Note: If the client is a RaspberryPi, then you also have to install
raspberrypi-kernel-headersand reboot:apt install raspberrypi-kernel-headers reboot
On each client, start up the WG interface and test that it works:
wg-quick up ./student1.conf

ip addr
ping 10.100.100.1
ping 192.168.100.1
ping 192.168.100.2
ping 192.168.100.3

wg-quick down ./student1.conf
On each client, make the WG interface to start up automatically, as a service:
mv student1.conf /etc/wireguard/wg0.conf
systemctl enable wg-quick@wg0
systemctl start wg-quick@wg0
systemctl status wg-quick@wg0

ip addr
ping 10.100.100.1
ping 192.168.100.1
4. Setup Epoptes server
The teachers have to do these on their computers:
Install Epoptes server:
apt install --install-recommends epoptes
Add username to group
epoptes:adduser teacher epoptes
Make sure that the firewall allows the traffic from the VPN. For example, if you are using UFW, it can be done like this:
ufw allow in on wg0
### or
ufw allow from 192.168.100.0/24
5. Setup Epoptes clients
The students have to do these on their computers:
Install Epoptes client:
apt install --install-recommends epoptes-client
Edit
/etc/hostsand add a line like this:192.168.100.1 epoptes-server
Edit
/etc/default/epoptes-clientand set:SERVER=epoptes-server
Also comment out
WOL.Fetch the OpenSSL certificate from the Epoptes server:
epoptes-client -c
You may also need a reboot for the epoptes-client installation to take effect.
If a student wants to connect to another Epoptes server (another teacher), he should:
- Change the IP of the
epoptes-serveron/etc/hosts. Fetch the OpenSSL certificate from the new server:
rm /etc/epoptes/server.crt
epoptes-client -c
6. Caveats
Epoptes is designed for working on a LAN, so some things may not work
as expected on a VPN. For example WOL (Wake-On-LAN). However this is
not crucial.
Another thing is that when a teacher broadcasts his desktop to all the students, the Epoptes server has to send it to each client (for example 20-30 clients). This may generate a lot of traffic. While this may be OK on a LAN, it might not be feasible over the internet. To alleviate this problem, the teacher can use besides Epoptes some other tool that allows desktop sharing, like BigBlueButton, JitsiMeet, Zoom, etc. So, he can use Epoptes to see what each student is doing and to help them, and can use some other tool to broadcast his desktop.
Also, the setup procedure as described here does not seem to scale well. It is OK if there are only a few students, and they are able to use Linux (at least in a virtual machine), and they know some basics of command-line and can follow some simple instructions to setup the WireGuard and Epoptes clients. But what if there are a lot of students, and many teachers to which they have to connect? Some further automation might be needed, or maybe Epoptes can be extended to handle transparently the WireGuard setup etc.
7. Conclusion
- With Epoptes and a WireGuard server (installed on a VPN on cloud) it is possible to set up a virtual computer lab that allows each student (with his laptop) to participate remotely from home.
- Using Docker and docker-scripts, the setup of the WireGuard server is quite easy.
- This kind of remote collaboration might be useful for educational institutions, as well as for other organizations and companies.
- However it also has some limitations that need to be worked around, especially if there are a lot of participants.