Accessing Computer Labs Remotely
Table of Contents
1. Introduction
With COVID-19 pandemic, most of the schools and universities around the world have to do the teaching from home. In such conditions, being able to access computer labs remotely might be quite useful. In this article we will see how to achieve this with Guacamole, WireGuard VPN, and a VPS on the cloud.
We would like to build something like this:
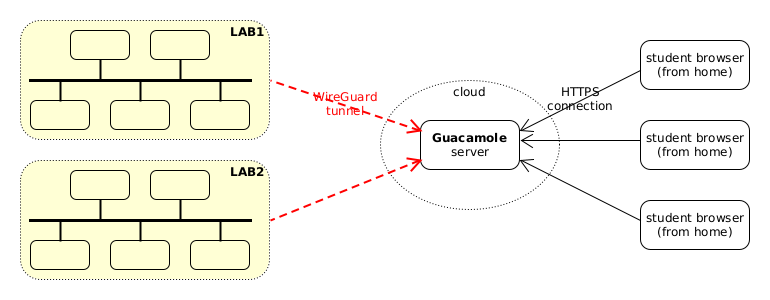
Figure 1: Accessing computer labs through Guacamole
Students can use a normal web browser to access Guacamole, which is installed on a VPS on the cloud, and from Guacamole they can access any of the workstations in the labs.
They can login on the computer labs with the same username and password that they would normally login if they accessed them physically. Besides this, they also need a username and password for accessing the Guacamole interface. Policies on Guacamole can also restrict which workstations from the labs they can access.
Computer labs are private LANs located behind a firewall. They don't have public IPs and normally cannot be accessed from the internet. However they can access the Guacamole server (which is located on the cloud and has a public IP), and we can create a WireGuard tunnel between them and the server. Through this tunnel, Guacamole can access each of them. Students, who can access Guacamole through its public IP, can also access each computer through Guacamole.
2. Deployment diagram
Let's use a deployment diagram to understand better what we are going to build. The details in it are just an example which may help to understand easier the explanation of the setup:
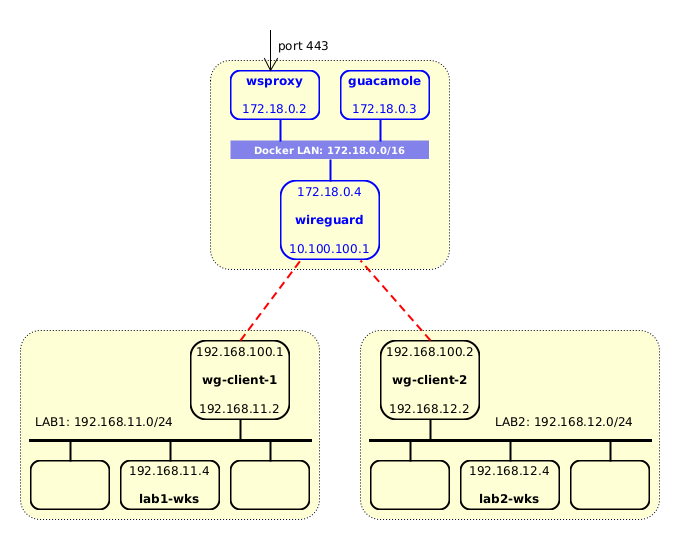
Figure 2: A diagram with more details
In the VPS we have a Guacamole container and a WireGuard container which are located on the same Docker virtual network. HTTP requests go to guacamole through wsproxy, which is another container that serves as a reverse HTTP proxy.
There are WireGuard connections (tunnels) between the wireguard
container and wg-client-1, and between wireguard and
wg-client-2. There is no direct connection between guacamole and
any of the computer labs. However we can add routes on guacamole so
that the networks of the labs (192.168.11.0/24 and
192.168.12.0/24) are routed via the wireguard container. At the
same time, we also need to add routes on the workstations of the labs
so that the routes to the Docker LAN (172.18.0.0/16) go via the WG
clients (192.168.11.2 and 192.168.12.2).
The docker containers are managed with docker-scripts. The reverse HTTP proxy container (wsproxy) forwards the requests to the corresponding container according to the domain, gets automatically a free LetsEncrypt SSL certificate for each domain, and also redirects automatically all HTTP requests to HTTPS.
The steps to make this setup would be like this:
- Install Docker and docker-scripts on the VPS.
- Install docker-scripts containers wsproxy, guacamole and wireguard.
- On the wireguard container generate configurations for each client.
- Move WireGuard configurations to each client and start up the WG interfaces.
- Make sure that the guacamole container has proper routes to LANs of the labs, that go via the wireguard container.
- Make sure that each workstation on the labs has proper routes to guacamole, that go via the WG clients.
- Finally, create connections on guacamole for each workstation, create users, groups, etc.
3. Make installations on the VPS
3.1. Install docker and docker-scripts
Install Docker:
curl -fsSL https://get.docker.com -o get-docker.sh
sudo sh get-docker.sh
Install docker-scripts:
apt install git make m4
git clone https://gitlab.com/docker-scripts/ds /opt/docker-scripts/ds
cd /opt/docker-scripts/ds/
make install
3.2. Install wsproxy and guacamole
Install wsproxy:
ds pull wsproxy
ds init wsproxy @wsproxy
cd /var/ds/wsproxy/
vim settings.sh
ds make
Install guacamole:
ds pull guacamole
ds init guacamole @guacamole
cd /var/ds/guacamole/

# make sure to change at least the DOMAIN and the admin PASS
vim settings.sh

ds make
For more details about installing and using Guacamole see also: http://dashohoxha.fs.al/virtual-computer-lab/
3.3. Install wireguard
Get the scripts and initialize a directory for the container:
ds pull wireguard
ds init wireguard @wireguard
cd /var/ds/wireguard/
Edit
settings.shand make sure to comment outNETWORKandSUBNET:# NETWORK=wgnet # SUBNET='172.20.0.0/16'
These are used to tell docker-scripts in which Docker network to attach the container (the network will be created if it doesn't exist). In this case we want the wireguard container to be on the same network as the other containers (guacamole and wsproxy). We are commenting these settings so that the default docker-scripts network is used (
172.18.0.0/16).Make sure to change these settings as well:
ROUTED_NETWORKS="10.100.100.1, 172.18.0.0/16"
ALLOW_INTERNET_ACCESS=no
CLIENT_TO_CLIENT=no
KEEPALIVE_PERIOD=25
Here,
10.100.100.1is the IP of the WG interface on the wireguard container and172.18.0.0/16is the subnet of the docker virtual LAN where the containers are attached. WG clients will route the traffic to these networks through the WG interface.ALLOW_INTERNET_ACCESSis set tonobecause we don't want the workstations to access the internet through the wireguard server, andCLIENT_TO_CLIENTis set tonobecause we don't want the workstations to be able to ping (access) each-other.The last setting tells the clients to send a keep-connection-alive package every 25 seconds. This prevents the NAT sessions from expiring and makes sure that each workstation can be accessed from guacamole at any time.
For more details about these settings and their meanings see also the WireGuard Usecases.
Finally run
ds maketo build, create and configure the container.ds make
4. Setup WireGuard clients
On the server, add configurations for each WG client:
cd /var/ds/wireguard/
ds client add wg-client-1 192.168.100.1 192.168.11.0/24
ds client add wg-client-2 192.168.100.2 192.168.12.0/24
ds client ls
ls clients/
On the command
ds client add, besides the name and the WireGuard IP of the client, we also give the network (LAN) where this client is going to be a router for the WG traffic. This tells the WG server to allow and forward the traffic coming from these IPs:cat wg0.conf | grep -E '^|AllowedIPs.*'
Transfer configuration files to the clients. This can be done with copy/paste, using
scp, etc.You can also share these configuration files like this:
ds client ls
ds share
ds share www wg-client-1
ds share www wg-client-2
ls www/
Then, on each client you can get the configuration file like this:
wget --no-check-certificate -O wg-client-1.conf \
     https://12.34.56.78:10443/clients/wg-client-1.conf.rUZo4wu7VRFlU6L
On each client, test the connection to the wireguard server. Assuming that you are using Debian/Ubuntu, you have to install first the
wireguardpackage, like this:apt install wireguard
Note: If the client is a RaspberryPi, then you also have to install
raspberrypi-kernel-headersand reboot:apt install raspberrypi-kernel-headers reboot
Now start up the WG interface and test that it works:
wg-quick up ./wg-client-1.conf

ip addr
ping 10.100.100.1

wg-quick down ./wg-client-1.conf
On each client, make the WG interface to start up automatically, as a service:
mv wg-client-1.conf /etc/wireguard/wg0.conf
systemctl enable wg-quick@wg0
systemctl start wg-quick@wg0
systemctl status wg-quick@wg0

ip addr
ping 10.100.100.1
5. Add additional routes on Guacamole
If we try to ping from guacamole to WG clients it will fail:
cd /var/ds/guacamole/
ds shell
apt install iputils-ping traceroute
ping 192.168.100.1
traceroute 192.168.100.1
You will notice that the route to the wg-client-1 (192.168.100.1)
is not passing via wireguard (172.18.0.4). To fix this we need to add
a route like this:
ip route add to 192.168.100.0/24 via 172.18.0.4
However this one fails too, because the wireguard container has not
been created with the capability to administrate the network stack. We
need to use the docker option --cap-add net_admin when we create the
container.
To fix this and some other issues, let's customize this instance of
wireguard container by creating the file ds.sh like this:
cd /var/ds/guacamole/
cat <<'EOF' > ds.sh
cmd_make() {
    ds build
    ds create --cap-add net_admin
    ds config

    ds inject setup-run-on-start.sh

    ds exec apt install --yes dnsutils
    ds exec apt install --yes iputils-ping traceroute
}
EOF
This is going to override the command ds make with a customized one.
Usually ds make is just a shortcut for ds build; ds create; ds
config, but now we are also using an extra option (--cap-add
net_admin) with ds create, we are running the configuration script
setup-run-on-start.sh, and we are installing some extra packages.
Now let's make the container again:
ds make
The script setup-run-on-start.sh installs a systemd service inside
the container that runs each time that the container is started,
checks whether the script scripts/run-on-start.sh exists and is
executable, and if so, runs it.
We can use the script scripts/run-on-start.sh to add extra routes
once the container starts, like this:
cd /var/ds/guacamole/
cat <<'EOF' > scripts/run-on-start.sh
#!/bin/bash
wireguard_ip=$(dig wireguard +short)
ip route add to 192.168.100.0/24 via $wireguard_ip
ip route add to 192.168.11.0/24 via $wireguard_ip
ip route add to 192.168.12.0/24 via $wireguard_ip
EOF
chmod +x scripts/run-on-start.sh
Notice that we added routes not only for the WG clients but also for
the LAB1 and LAB2 LANs (192.168.11.0/24 and 192.168.12.0/24). The
command dig that is needed to get the IP of wireguard has been
installed on the container by the package dnsutils.
Let's see whether it works:
ds restart
ds shell
ip route
ping 192.168.100.1
ping 192.168.100.2
traceroute 192.168.100.1
If you try to ping from wg-client-1 and wg-client-2 to guacamole
(172.18.0.3) it should also work. This is because we have included
172.18.0.0/16 in the setting ROUTED_NETWORKS on wireguard, and
this in turn includes it in the configuration of each client, at the
setting AllowedIPs (check /etc/wireguard/wg0.conf on the clients).
This setting makes the command wg-quick up to automatically add a
route to this network when the WG interface goes up. So we don't need
to add it manually
6. Add additional routes on each workstation
If we go to any of the non-WG workstations of LAB1 or LAB2 (for
example lab1-wks or lab2-wks) and try to ping to guacamole
(ping 172.18.0.3), it will fail. A traceroute command shows that
the route to guacamole is not going via the WG client (wg-client-1
or wg-client2). So, we need to fix this by adding a route like this
on each workstation of LAB1 or LAB2:
ip route add to 172.18.0.3 via 192.168.11.2   # on LAB1 workstations
### or
ip route add to 172.18.0.3 via 192.168.12.2   # on LAB2 workstations
After this, we will be able to ping guacamole from each workstation,
and also from guacamole we will be able to ping to each workstation
of LAB1 or LAB2 (for example: ping 192.168.11.4 or ping
192.168.12.4). This is because we have already added the routes to
192.168.11.0/24 and 192.168.12.0/24 on scripts/run-on-start.sh
on the guacamole container.
Note: For a working example of this usecase see this testing script:
You can try it like this:
git clone https://gitlab.com/docker-scripts/wireguard
cd wireguard/testing/
apt install highlight expect
./test6.sh
7. Setup Guacamole
The last thing is to go to the guacamole container and use the
command ds guac to add servers, users and connections to each
workstation. For example:
ds guac

# add a user for each lab
ds guac user add lab1 pass1
ds guac user add lab2 pass2

# add a server for each workstation on lab1
ds guac server add 192.168.100.1
ds guac server add 192.168.11.3
ds guac server add 192.168.11.4
ds guac server add 192.168.11.5

# add a server for each workstation on lab2
ds guac server add 192.168.100.2
ds guac server add 192.168.12.3
ds guac server add 192.168.12.4
ds guac server add 192.168.12.5

# allow user 'lab1' to connect to the workstations on lab1
ds guac user connect lab1 192.168.100.1
ds guac user connect lab1 192.168.11.3
ds guac user connect lab1 192.168.11.4
ds guac user connect lab1 192.168.11.5

# allow user 'lab2' to connect to the workstations on lab2
ds guac user connect lab2 192.168.100.2
ds guac user connect lab2 192.168.12.3
ds guac user connect lab2 192.168.12.4
ds guac user connect lab2 192.168.12.5
Then the students that login in guacamole with the username and
password of LAB1 (lab1/pass1) will be able to connect to any of the
workstations of the LAB1, and if they login with the username lab2
will be able to connect to any workstation on LAB2.
However, before accessing a workstation, they will also need to use the username and password that they normally use when they access it physically. So, they usually need two pairs of username/password, one for accessing the Guacamole interface, which allows them to connect to certain workstations, and another pair that is needed to login to a workstation.
Of course, the setup above is just an example and there are other ways to organize users, groups and workstations, to do authentication and login, etc. For more details see:
Note: The example above with ds guac assumes that the workstations
are Linux systems that can be accessed through Guacamole by SSH or
RDP. You can install xrdp on Debian/Ubuntu with: apt install xrdp.
8. Conclusion
With Guacamole and WireGuard VPN (installed on a VPN on cloud) it is possible to setup network connections that allow accessing computers in a private LAN remotely and safely. If we use Docker and docker-scripts for installing Guacamole and WireGuard this setup is easy. This kind of remote access could be useful for educational institutions, as well as for other organizations and companies.