Virtual Computer Lab
Table of Contents
Virtual Computer Lab is a desktop server in the cloud that can be accessed from a browser. It provides remote collaboration for the students of a class and their teacher.
Each user can share his desktop with one or more other users and they can work on it collaboratively. The teacher can also use Epoptes to watch what each of the students is doing, to broadcast his screen to all of them, to access the desktop of each of the students for helping them, etc.
This simple and non-technical diagram shows how the VCL is used:
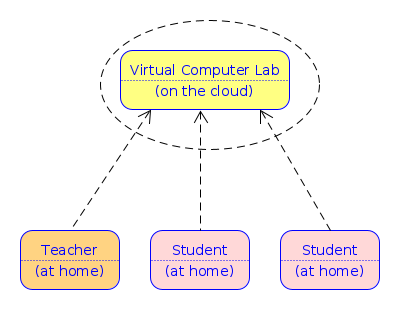
Figure 1: Virtual Computer Lab in the Cloud
However it also makes sense to install and use the VCL in a LAN. This is shown in the following diagram:
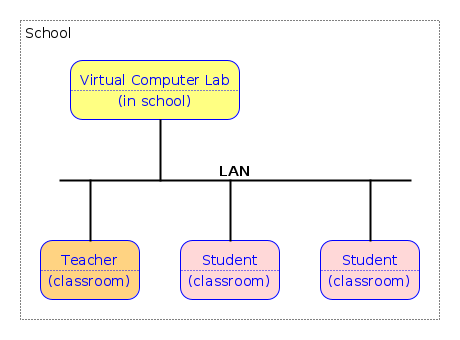
Figure 2: Virtual Computer Lab in the Classroom
Installation is almost the same in both cases, with very small differences, and we will see both of them.
Note: You can find an interactive installation tutorial at https://katacoda.com/dashohoxha/courses/docker-scripts/virtual-computer-lab
1 Installing VCL in the cloud
Let's assume that we already have a VPS on the cloud, and a domain
like vcl.example.org that is pointing to it. Installation is done
with docker and docker-scripts as described in the following sections.
1.1 Install docker
We can install docker like this:
curl -fsSL https://get.docker.com -o get-docker.sh
sh get-docker.sh
1.2 Install docker-scripts
Docker-Scripts is a shell script framework for Docker. Install it with these commands:
apt install m4 git
git clone https://gitlab.com/docker-scripts/ds \
          /opt/docker-scripts/ds
cd /opt/docker-scripts/ds/
make install
ds
ds -h
1.3 Install wsproxy
We need wsproxy (web server proxy) for getting a letsencrypt SSL certificate. Install it like this:
ds pull wsproxy
ds init wsproxy @wsproxy
cd /var/ds/wsproxy/
vim settings.sh
ds make
1.4 Install Guacamole
Guacamole is like a gateway (or proxy) that provides access to the computer(s) of the lab through a web interface. We can install it like this:
ds pull guacamole
ds init guacamole @vcl.example.org
cd /var/ds/vcl.example.org/
vim settings.sh
ds make
Make sure to replace vcl.example.org with your domain and also to
set proper values on settings.sh. You should change at least the
admin password, otherwise the installation script will not continue.
After installation is finished, open https://vcl.example.org in browser and login as admin. You will notice that there are no connections yet, and this is normal because we haven't installed any servers yet.
1.5 Install LinuxMint in a container
The docker-scripts for linuxmint install a minimal version with MATE desktop (but we will see later how to add more packages to it):
ds pull linuxmint
ds init linuxmint @linuxmint
cd /var/ds/linuxmint/
vim settings.sh
On settings.sh, leave CONTAINER as it is (linuxmint-1), but
uncomment epoptes and admin users. Make sure to change the
ADMIN_PASS.
CONTAINER="linuxmint-1"

EPOPTES_USERS="admin user1"

ADMIN_USER="admin"
ADMIN_PASS="pass123"
Let's also list some user accounts on accounts.txt:
cat <<EOF > accounts.txt
user1:pass1
user2:pass2
user3:pass3
user4:pass4
EOF
Finally, we can start making the container with ds make. Be patient
and wait until it is done.
1.6 Configuration of Guacamole
Being the admin user on the Guacamole web interface, you can do all the configurations that are needed (users, connections, etc.). However the docker-scripts of guacamole provide a simple command that can be useful for doing the configuration easily and quickly (and also for automating it with a script, if needed). It works like this:
cd /var/ds/vcl.example.org/
ds guac
ds guac server add linuxmint-1
ds guac server ls
ds guac user add student pass123
ds guac user ls
ds guac user connect student linuxmint-1
ds guac user ls student
Instead of student and pass123 you can use whatever else you like,
however linuxmint-1 is the name of the linuxmint container.
Now you can go to https://vcl.example.org and try to login as the new
user. Then you can open a RDP connection to the LinuxMint server and
login with user1:pass1 (or admin:pass123).
2 Installing VCL in LAN
Installing VCL in LAN is very similar to installing it in the Cloud, but in this case we don't have a public IP, we don't have a real domain name, and we cannot get an SSL certificate. Since we don't have a domain name and don't need to get an SSL certificate, we also don't need to use a wsproxy.
Also in this case we need to make sure that the computer where VCL is installed has a good network connection to the LAN (for example at least a 1Gbps network interface), since it might have to serve simultaneously 20-30 clients.
2.1 Preparation
Let's summarize the initial steps quickly:
- Install docker:
curl -fsSL https://get.docker.com -o get-docker.sh
sh get-docker.sh
- Install docker-scripts:
apt install m4 git
git clone https://gitlab.com/docker-scripts/ds \
          /opt/docker-scripts/ds
cd /opt/docker-scripts/ds/
make install
2.2 Install and config Guacamole
- Install Guacamole:
ds pull guacamole
ds init guacamole @guacamole
cd /var/ds/guacamole/
vim settings.sh
ds make
This is almost the same as before, except that you should:
- Comment out the
DOMAINandSSL_CERT_EMAILonsettings.sh. - Add PORTS="443:443" on
settings.sh(since the container is not being served by wsproxy, we need to forward the port 443 to it).
You should also change at least the admin password, same as before.
- Comment out the
- Setup the configuration of Guacamole:
ds guac server add linuxmint-1
ds guac user add student pass123
ds guac user connect student linuxmint-1
We can setup guacamole with
linuxmint-1even if it is not installed yet.
2.3 Install and config LinuxMint
- Install linuxmint:
ds pull linuxmint
ds init linuxmint @linuxmint
cd /var/ds/linuxmint/
vim settings.sh
ds make
- Create user accounts on linuxmint:
cat <<EOF >> accounts.txt
user3:pass3
user4:pass4
EOF
ds users create accounts.txt
Installation scripts have created automatically the users
user1anduser2, and we just created some more user accounts. - Create an admin user:
ds inject add-admin.sh admin pass123
- Allow
user1to use Epoptes:ds exec adduser user1 epoptes
Basically, this executes the command
adduser user1 epoptesinside the container, which adds useruser1to the groupepoptes. - Install another package:
ds shell
apt install frozen-bubble
exit
Note: The changes made on steps (3), (4) and (5) are not
persistent. This means that if we rebuild the container (with ds
make or ds remake) they will not be preserved and we will have to
do them again.
3 Using VCL
3.1 Share the desktop
Any user can share his desktop with one or more friends. This is a
feature provided by Guacamole. You first press Ctrl+Alt+Shift, then
select the menu Share on the left panel that is opened, and then
Watch or Collaborate. Guacamole shows the URL of your session,
that you can share. Right click on it and copy the URL, then send it
to your friends (via chat, email, etc.). If you selected Watch, your
friends will be able to see what you are doing on your desktop, but
cannot interfere. However if you selected Collaborate, they will
also be able to work on your desktop, besides you.
This might be useful when a teacher wants to show to his students what he is doing, or when students have to collaborate on a project.
3.2 Control the students with Epoptes
Epoptes is a management and monitoring tool for computer labs. It works well in the VCL and it is installed by default. With Epoptes you can:
- See the students that have logged in the VCL.
- Watch the desktop of each of them.
- Broadcast your desktop to all the students or some of them.
- Access the desktop of a student in order to help him.
- Lock the desktop of one or more students.
- Logout one or more students.
3.3 Manage user accounts
We have already seen that user accounts can be created with a command like:
ds users create accounts.txt
where accounts.txt is a file that looks like this:
user1:pass1
user2:pass2
...
We can also backup and restore user accounts like this:
ds users backup
ds users restore backup/users-20200528.tgz
Some other commands of ds users are export/import, which are similar
to backup/restore, but save only the username and password of each
account, not the home directory.
Users can also be managed by the admin(s) of the linuxmint system,
using sudo users.sh. For example:
sudo users.sh create accounts.txt
sudo users.sh backup
sudo users.sh restore /host/backup/users-20200528.tgz
3.4 Install more packages
Admin users of linuxmint can manage packages with sudo apt, like
this:
sudo apt install frozen-bubble
sudo apt purge frozen-bubble
From the host system (from outside the container) new packages can also be installed like this:
ds exec apt install frozen-bubble
These installations are not persistent. When we rebuild the container
(with ds make or ds remake) we will have to install them again.
To rebuild the linuxmint container with additional packages, follow these steps:
- First create a file named
packages, with a content like this:RUN apt install --yes frozen-bubble
- Then change the name of the IMAGE on
settings.sh:IMAGE="linuxmint"
- Finally build and make the container:
ds build && ds make
This is going to build the image locally (instead of pulling it from the docker hub). Usually it takes much longer than just pulling an off-the-shelf image.
Note: Don't use
ds remakebecause it removes first the image (that was just built withds build). - You can also override the command
ds remakeby creating a local one oncmd/remake.sh, like this:mkdir -p cmd cat << 'EOF' > cmd/remake.sh cmd_remake() { # backup ds users backup # reinstall ds build ds make ds restart # restore local datestamp=$(date +%Y%m%d) ds users restore backup/users-$datestamp.tgz } EOFNow, when you run
ds remake, it will runds buildandds make, taking care to backup first and restore afterwards.
3.5 Create guest accounts
Guest accounts are shared accounts that are used temporarily by different users. The home directory and settings of a guest account are reset automatically when the user logs out (or logs in).
We can create guest accounts like this:
cd /var/ds/linuxmint/
ds guest-accounts

# generate a list of guest accounts
ds guest-accounts generate 3
ds guest-accounts gen 30 > guests.txt
tail guests.txt

# create guest accounts on linuxmint
ds guest-accounts create-lm guests.txt
ds exec ls /home/guest-accounts/

# create guest accounts on guacamole
ds guest-accounts create-guac guests.txt > guest-urls.txt
cat guest-urls.txt
For more details about guest accounts see: https://gitlab.com/docker-scripts/linuxmint/-/wikis/Guest-Accounts
4 Advantages and benefits of using VCL
- It allows teachers (especially programming teachers) to make a meaningful online lesson, being able to follow what the students are doing and to help them if needed.
- The students can also collaborate easily with each-other for homeworks and projects, while keeping the required social distancing.
- It doesn’t have to be limited to the students, the teams of programmers or system admins can use it as well to collaborate with each-other.
- It can be accessed from any platform or operating system (Linux, Mac, Windows, iPad, RaspberryPi, Chromebook, etc.) and doesn't need anything to be installed, as long as there is a browser.
- Clients don't need to be powerful machines or to have lots of resources. All that is needed is a browser tab (and internet connection). Everything runs on the server.
- Can be installed on a LAN too. The benefit in this case would be that it is much easier to manage a single server than 20-30 computers. For example if you need to install a software for the next lesson (for example LibreOffice, or Geany), you can install it once on the server and you are done (instead of having to install it in each computer of the lab). User accounts are also centralized and much easier to maintain, homeworks can be submitted more easily, etc.