LTSP Use Cases
Table of Contents
1 About LTSP
LTSP allows computers of a LAN to boot through the network from a single server. The benefits of using it are reduced hardware costs and reduced time of maintenance.
Hardware costs are reduced because the clients don't need to be powerful, since everything (or almost everything) runs on the server. They don't need to have a hard-disk and don't need to have much RAM.
The time of maintenance is reduced because there is only the server to be maintained, not 20-30 computers of the LAN. Installing new software, updating, upgrading etc. is done only once on the server. The reduced time of maintenance is becoming the most important benefit of using LTSP, as hardware becomes cheaper.
Besides these, LTSP has other administration and communication benefits. For example it provides centralized user accounts (a user can login to his account from any terminal). Or screen/desktop sharing (for example a teacher can show his desktop to the students for demonstration, or can see what they are doing, and even help them remotely).
In this article we will see some of the cases when LTSP can be used, and how. In all the cases there is a classroom of computers connected to a LAN, and all the computers can boot from network.
2 A Gateway Server With 2 NICs
2.1 Description
There is a gateway server with two NICs, one of them connected to the LAN and the other connected to the Internet (WAN). This is the classic LTSP use case. The server offers DHCP and DNS service as well, besides being a gateway.
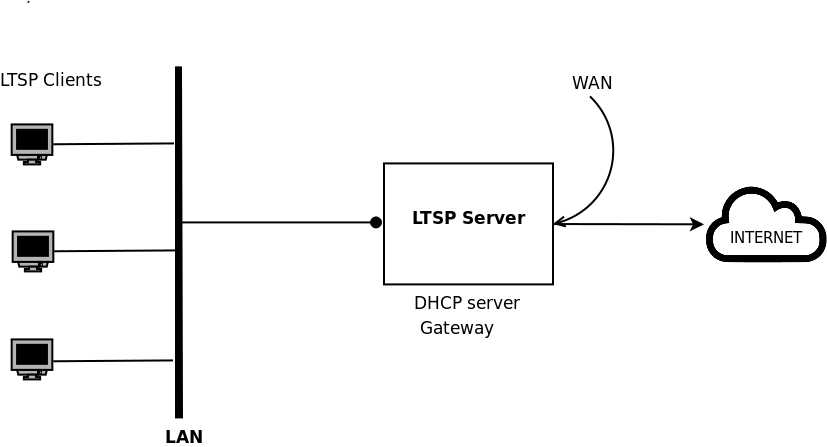
Figure 1: LTSP server is also Gateway and DHCP server.
2.2 Installation
Assuming that we have installed Ubuntu-18.04, we can follow these instructions for making it a LTSP server: http://wiki.ltsp.org/wiki/Installation/Ubuntu
Use chrootless mode if all the computers on the LAN have the same architecture with the server. Otherwise use chroot mode if you have different architectures.
2.3 RaspberryPi Clients
If you have RaspberryPi clients, use one of these instructions instead:
2.4 Automated Installation
If you want to use an installation script that automates most of the configurations, follow these instructions:
- Get the scripts:
git clone https://gitlab.com/Virtual-LTSP/VirtualBox ltsp
cd ltsp/
- Edit
settings.shand make sure to:- set *DEVELOPMENT="no"*
- set *GATEWAY="yes"*
- set LAN_IF to the name of the network interface connected to the LAN
- change ADMIN_PASS, GUEST_PASS, GUAC_PASS
- optionally change HOSTNAME and the PACKAGES that need to be installed on the clients
- Start the installation with:
./install.sh
However there are some things that you should be aware of:
- You should run these scripts on a fresh installation of Ubuntu-18.04 (or its derivatives, like LinuxMint-19). Otherwise, the configurations that you may have done previously may confuse the automated scripts and the result may not be as expected.
- These scripts install only a chrootless LTSP, which means that the architecture of all the clients is expected to be the same with the architecture of the server. If you have different clients, you have to make manually the necessary configurations (for example creating chroot images and changing lts.conf).
- The chrootless mode of LTSP usually works well with fat clients, which means that they should have at least 1GB RAM. However, with a desktop like Xfce (for example LinuxMint Xfce) I have noticed that a 512MB client runs ok too.
2.5 Installing in a Virtual Machine
Sometimes it is preferable to run the LTSP server on a virtual machine, because you want to install other things on the server as well (for example one or more web applications). This allows the applications to be isolated from each other, so that their requirements do not interfere. It also provides more security and stability.
It is possible to run an LTSP server on a virtual machine, if the network interfaces of the virtual machine are bridged over the physical interfaces of the server. For example see this article for how to do it with KVM: http://dashohoxha.fs.al/virtual-machine-management-on-ubuntu/
However you can also use the Virtual LTSP scripts to install almost automatically a LTSP server with VirtualBox and vagrantup:
- Install virtualbox and vagrant:
apt install virtualbox vagrant - Get the scripts:
git clone https://gitlab.com/Virtual-LTSP/VirtualBox ltsp-virtualbox
cd ltsp-virtualbox/
- Edit
settings.shand make sure to:- set *DEVELOPMENT="no"*
- set *GATEWAY="yes"*
- set LAN_IF to the name of the network interface connected to the LAN
- change ADMIN_PASS, GUEST_PASS, GUAC_PASS
- optionally change HOSTNAME and the PACKAGES that need to be installed on the clients
- optionally change VM_BOX and VM_RAM, if you want to change the base system, or to allocate more RAM to the virtual machine
- Start the installation with:
./server.sh buildIt takes a lot of time to download images and to install packages, so be patient. - Use
./server.sh haltto stop the server and./server.sh upto start it again. Or go toltsp-server/and usevagrant haltandvagrant up. You can usevagrant sshas well, to login to the server, if needed.
Note: In case that some of the clients do not match the architecture
of the virtual machine, you have to build manually chroot images for
them and to change the necessary configuration files (like lts.conf).
3 A Dual-Boot Non-Gateway PC With 1 NIC
3.1 Description
There is a classroom of 20-30 identical computers connected in a LAN. These are not thin clients but decent computers with at least 1GB RAM, a hard disk, and maybe some OS installed on them (for example Windows). There is also a gateway to the Internet which provides automatic network configuration for the LAN (DHCP and DNS services).
For some reasons it is not possible to install a LTSP server on the gateway (maybe it is just a switch/router, maybe there is something else installed on the gateway, maybe we simply don't have permission to access it and install things on it, etc.)
However let's assume that we can access computers of the classroom and we can make one of them dual-boot with Ubuntu-18.04 (or LinuxMint-19). In this case it is possible to make it a LTSP server for the rest of the computers of the classroom.
I think that this is the most common situation nowadays in a lot of small schools (a classroom of computers installed with Windows, connected to a LAN, with a switch/router that provides internet services).
Since all the computers on the LAN are identical with the LTSP server, the chrootless mode installation of LTSP is the most suitable one. In this mode of installation the server is used as a template for the clients. Whatever is installed on the server will also be available to the clients. The fact that the clients are fat (1GB of RAM or more) means that all the applications will run locally on the client, so the server itself does not need to have much RAM or to be powerful.
In this case, the LTSP server has only one network interface (NIC) that is connected to the LAN and it does not have to offer (and it should not offer) internet services (DHCP+DNS+NAT). The clients can get these services from the router/gateway.
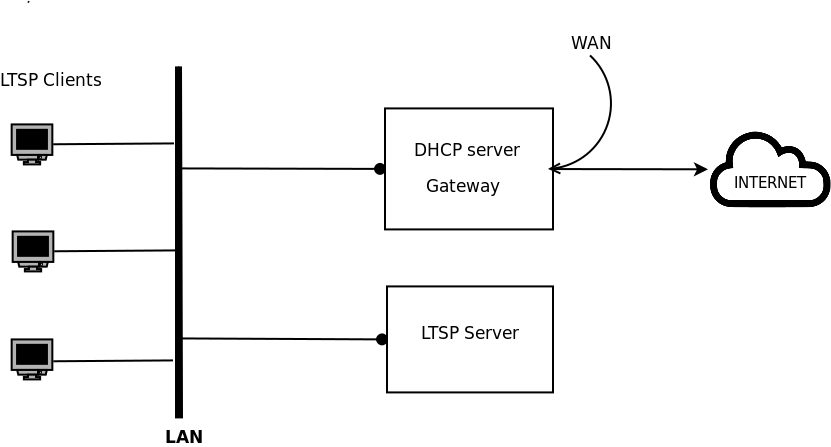
Figure 2: LTSP server is a normal computer of the LAN (not Gateway and DHCP).
3.2 Installation
Assuming that we have installed Ubuntu-18.04 on one of the computers (maybe as a dual-boot, without destroying the existing system), we can follow these instructions for making it a LTSP server: http://wiki.ltsp.org/wiki/Installation/Ubuntu
As mentioned in the previous section, we should use the chrootless mode of LTSP and we should not configure any NAT or DHCP range.
3.3 Automated Installation
For an almost automated installation, you can use Virtual-LTSP scripts like this:
- Get the scripts:
git clone https://gitlab.com/Virtual-LTSP/VirtualBox ltsp
cd ltsp/
- Edit
settings.shand make sure to:- set *DEVELOPMENT="no"*
- set *GATEWAY="no"*, since the server is not offering gateway/internet services
- set LAN_IF to the name of the network interface connected to the LAN
- change ADMIN_PASS, GUEST_PASS, GUAC_PASS
- optionally change HOSTNAME and the PACKAGES that need to be installed on the clients
- Start the installation with:
./install.sh
You should run these scripts on a fresh installation of Ubuntu-18.04 (or its derivatives, like LinuxMint-19). Otherwise, the configurations that you may have done previously may confuse the automated scripts and the result may not be as expected.
These scripts install a chrootless LTSP, which is OK since all the clients are identical to the server. If you also have clients that are different from the server, you have to make manually the necessary configurations (for example creating chroot images and changing lts.conf).
4 A Laptop That Can Be Connected To The LAN
4.1 Description
There is a LAN connected to the internet through a gateway, but we don't have access or permission to make changes neither to the gateway, nor to the computers of the LAN. However we can connect our laptop to the LAN with a network cable.
In this case it is possible to install a LTSP server in our laptop and boot the computers of the LAN from it.
4.2 Installation
Assuming that we have installed Ubuntu-18.04 on the laptop (maybe as a dual-boot), we can follow these instructions for making it a LTSP server: http://wiki.ltsp.org/wiki/Installation/Ubuntu
We should not configure any NAT or DHCP range, as there is only one NIC connected to the LAN, and the LAN already has a gateway and DHCP server.
4.3 Automated Installation
If we have a fresh installation of Ubuntu-18.04 (or its derivatives, like LinuxMint-19) as a dual-boot system, we can use Virtual-LTSP scripts like this:
- Get the scripts:
git clone https://gitlab.com/Virtual-LTSP/VirtualBox ltsp
cd ltsp/
- Edit
settings.shand make sure to:- set *DEVELOPMENT="no"*
- set *GATEWAY="no"*, since the server is not offering gateway/internet services
- set LAN_IF to the name of the network interface connected to the LAN
- change ADMIN_PASS, GUEST_PASS, GUAC_PASS
- optionally change HOSTNAME and the PACKAGES that need to be installed on the clients
- Start the installation with:
./install.sh
These scripts install only a chrootless LTSP, which means that the architecture of all the clients is expected to be the same with the architecture of the laptop. If you have different clients, you have to make manually the necessary configurations (for example creating chroot images and changing lts.conf).
4.4 Installing in a Virtual Machine
If the laptop has enough RAM (4GB or more), we can also install a LTSP server on a VirtualBox machine. The most easy way is to use the Virtual LTSP scripts:
- Install virtualbox and vagrant:
apt install virtualbox vagrant - Get the scripts:
git clone https://gitlab.com/Virtual-LTSP/VirtualBox ltsp-virtualbox
cd ltsp-virtualbox/
- Edit
settings.shand make sure to:- set *DEVELOPMENT="no"*
- set *GATEWAY="no"*
- set LAN_IF to the name of the network interface connected to the LAN
- change ADMIN_PASS, GUEST_PASS, GUAC_PASS
- optionally change HOSTNAME and the PACKAGES that need to be installed on the clients
- optionally change VM_BOX and VM_RAM, if you want to change the base system, or to allocate more RAM to the virtual machine
- Start the installation with:
./server.sh buildIt takes a lot of time to download images and to install packages, so be patient. - Use
./server.sh haltto stop the server and./server.sh upto start it again. Or go toltsp-server/and usevagrant haltandvagrant up. You can usevagrant sshas well, to login to the server, if needed.
Note: In case that some of the clients do not match the architecture
of the virtual machine, you have to build manually chroot images for
them and to change the necessary configuration files (like lts.conf).