Testing FUSS with LXD
1. Introduction
FUSS is a GNU/Linux distribution based on Debian, for a Digitally Sustainable School.
Because I don’t have resources for testing it locally, I got a dedicated root server on Hetzner, and tried to test FUSS with virtual machines, virtual LANs etc.
I tried different virtualization technologies, like libvirt, proxmox, OpenNebula etc. but finally decided to use LXD, for being simpler and more convenient. It can handle both containers and virtual machines, has a nice command line interface, can be managed remotely, etc.
1.1. Install LXD
On the server (ubuntu:22.04) I have installed LXD with snap, like
this:
apt install snapd
snap --version
snap install lxd --channel=latest/stable
snap list
lxc list
lxd init
I have used a btrfs storage backend and more than 30GB
storage size. I have also disabled IPv6 for the containers. Other than
that, everything else was the default setting.
|
1.2. Access LXD from non-root user
-
Create a user first:
adduser user1 -
Enable remote connection on the server:
lxc config set core.https_address "[::]" lxc config set core.trust_password pass1234 -
As
user1, add a remote, like this:su - user1 lxc remote add localhost 127.0.0.1This will prompt you to confirm the fingerprint and then ask you for the password (
pass1234). -
Make it the default remote and test it:
lxc remote list lxc remote switch localhost lxc remote list lxc ls -
Unset
core.trust_password, for security reasons:exit # from user1 account lxc config get core.trust_password lxc config set core.trust_password "" lxc config get core.trust_password
1.3. Fix networking
Somehow, firewalld and docker interfere with the network communication in the virtual environment that we are creating, so that they cannot get an IP from DHCP, and cannot ping to the internet. The problem is that by default, an interface that is not added to any zone will be handled by the public zone of firewalld. This zone is meant for the interfaces that are connected to the internet, and is restricted by default. For example DHCP connections are not allowed.
We can fix this by adding the LXD interfaces to the zone trusted, which allows everything:
firewall-cmd --zone=trusted --list-all
firewall-cmd --permanent --zone=trusted --add-interface=lxdbr0
firewall-cmd --reload
firewall-cmd --zone=trusted --list-all
Besides this, forwarding from and to these interfaces needs to be
enabled in the firewall, but sometimes it might be blocked (for
example if you install Docker, it will set the policy of the FORWARD
chain to DROP). This can be fixed by adding a direct rule with
firewall-cmd, like this:
firewall-cmd --permanent --direct --add-rule \
    ipv4 filter FORWARD 0 -j ACCEPT
firewall-cmd --reload

firewall-cmd --direct --get-all-rules
This will enable forwarding for all the interfaces, lxdbr0 and the
ones that we will create later.
1.4. Setup Xpra
We need Xpra to access the graphical displays (VGA consoles) of the virtual machines remotely (for example from a laptop).
-
Let’s install it first (on the server):
apt install xpra virt-viewer \ tilix dbus-x11 python3-pil -
On the user account, let’s create a script for starting it:
su - user1 cat << EOF >> xpra-start.sh #!/bin/bash -x killall xpra xpra start :100 \ --start-new-commands=yes #--sharing=yes --readonly=no \ EOF chmod +x xpra-start.sh -
To access xpra remotely, we need ssh access to this account. Let’s create an ssh key:
ssh-keygen -t ecdsa -q -N '' -f xprakey s mkdir -p ~/.ssh chmod 700 ~/.ssh touch ~/.ssh/authorized_keys chmod 600 ~/.ssh/authorized_keys cat xprakey.pub >> ~/.ssh/authorized_keys -
Let’s set also the env variable
XDG_RUNTIME_DIR:echo 'export XDG_RUNTIME_DIR=$HOME/.xpra' >> ~/.bashrc echo 'export XDG_RUNTIME_DIR=$HOME/.xpra' >> ~/.profile exit -
On the client (laptop), create the script
xpra-attach.shwith a content like this:#!/bin/bash -x user=user1 server=10.11.12.13 port=2201 display=100 keyfile=$(mktemp) sed -n -e '/^----/,/^-----/p' $0 > $keyfile xpra attach ssh:$user@$server:$display \ --ssh="ssh -i $keyfile -p $port" \ --sharing=yes --readonly=no rm -f $keyfile exit 0 -----BEGIN OPENSSH PRIVATE KEY----- b3BlbnNzaC1rZXktdjEAAAAABG5vbmUAAAAEbm9uZQAAAAAAAAABAAAAaAAAABNlY2RzYS 1zaGEyLW5pc3RwMjU2AAAACG5pc3RwMjU2AAAAQQTSUZv73bV7X7SbDdbYznjw5MvNtNoo Ysvle3E3V78K7z+cl8l1SH7PAbKj6tsdCuy5jrAg50RMBzeJvWogJM2FAAAAqH+0ui1/tL otAAAAE2ViZHNhLXNoYTItbmlzdHAyNTYAAAAIbmlzdHAyNTYAAABBBNJRm/vdtXtftJsN 1tjOePDky8202ihiy+V7cTdXvwrvP5yXyXVHfs8BsqPq2x0K7LeOsCDnREwHN4m9aiAkzY UAAAAgJrRz4MHjtrsIkyaf/MG7qr2L+5Bnhvc1XaaxFT/zo38AAAANdXNlcjFAc2VydmVy MQECAw== -----END OPENSSH PRIVATE KEY-----Here
serveris the public IP (or hostname) of the server where Xpra is installed;portis the SSH port on the server;useris the account where we created the scriptxpra-start.sh;displayis the same display number that is used onxpra-start.sh; and the private key is the content of the filexprakeythat was generated on the server.
To start Xpra we run the script xpra-start.sh on the server:
su - user1
./xpra-start.sh
To connect to it we run the script xpra-attach.sh from the
client (laptop). We should get a tilix terminal by default, but if
not, we can start it from the Xpra icon (click it and keep it pressed,
then go to "Server", then to "Run a command" and release the mouse
button, type "tilix" and press Enter). From this terminal we can type
LXC commands, and when we try to access the display of a virtual
machine it will be shown on the laptop.
| See also the related section on appendix. |
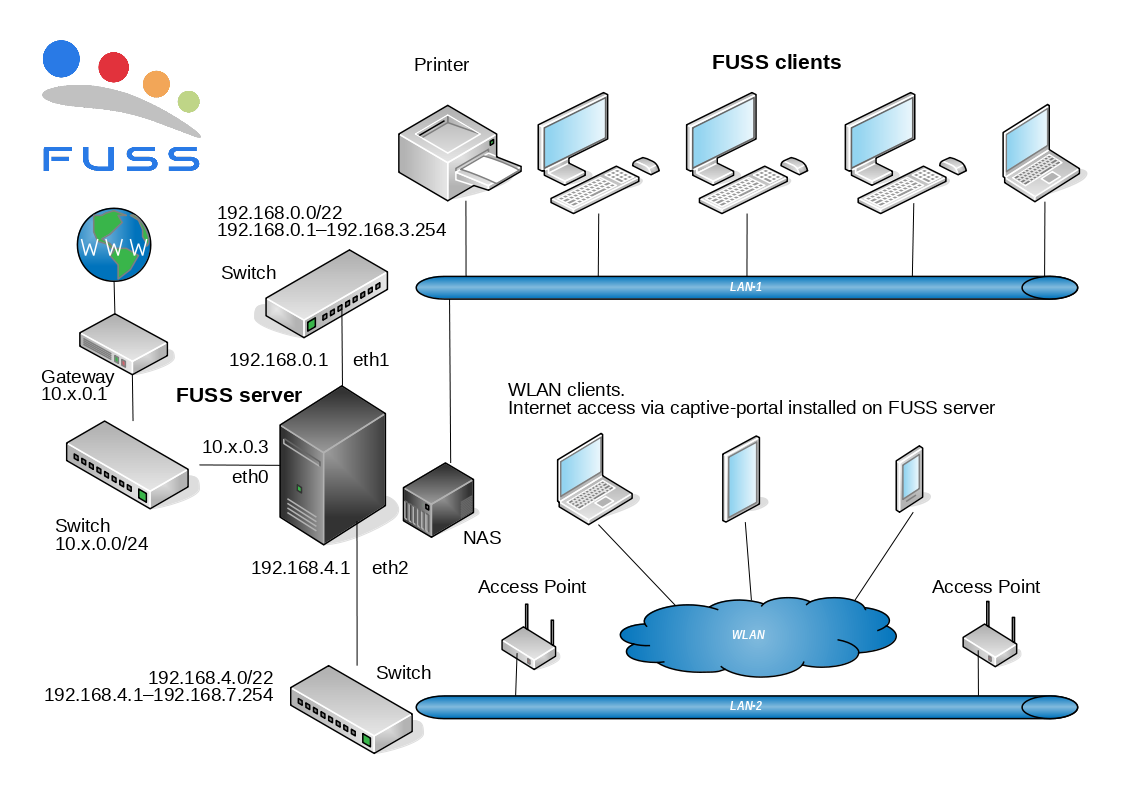
2. Create virtual LANs
All the containers and VMs are connected by default to a bridge (usually named lxdbr0), which provides them with DHCP, DNS, and allows them to connect to the internet. It acts like a gateway for the VMs.
But we also need another virtual LAN for the FUSS clients, and another
one for the Access Points. Let’s call them LAN1 and LAN2. These
LANs should not provide DHCP and should not act as a gateway for the
VMs, because this should be done by the FUSS server.
lxc network list
lxc network create LAN1 \
    ipv4.address=none ipv4.nat=false
lxc network show LAN1
lxc network unset LAN1 ipv4.address
lxc network unset LAN1 ipv4.nat
lxc network show LAN1

lxc network list
lxc network create LAN2 \
    ipv4.address=none ipv4.nat=false
lxc network show LAN2
lxc network unset LAN2 ipv4.address
lxc network unset LAN2 ipv4.nat
lxc network show LAN2
Let’s add them also to the trusted zone of firewalld:
firewall-cmd --permanent --zone=trusted --add-interface=LAN1
firewall-cmd --permanent --zone=trusted --add-interface=LAN2
firewall-cmd --reload
firewall-cmd --zone=trusted --list-all
3. Install the FUSS server
Traditional means installing it from scratch, starting from a basic debian installation, instead of using a pre-installed image to build a virtual machine inside proxmox.
First let’s stop the proxmox VM:
lxc stop proxmox3.1. Create a VM
lxc init fuss-server --empty --vm \
    --network=lxdbr0 \
    -d root,size=100GB \
    -c limits.memory=4GB -c limits.cpu=2
lxc network attach LAN1 fuss-server eth1 eth1
lxc network attach LAN2 fuss-server eth2 eth2
By default, the VM is connected to the network lxdbr0, which also allows it to access the internet. We also attach fuss-server to LAN1 and LAN2, so it is going to have two more network interfaces connected to these LANs.
With the last command we also make the size of the disk bigger than the default one.
Notice (on the first command) that instead of providing an image for
the VM, we have used the option --empty, which means that
nothing will be installed by default on the disk. We need to download
the
installation
iso of Debian 12 ("bookworm") and attach it to the VM like a CDROM:
wget https://cdimage.debian.org/debian-cd/current/amd64/iso-cd/debian-12.1.0-amd64-netinst.iso

lxc config device add \
    fuss-server cdrom disk \
    source=$(pwd)/debian-12.1.0-amd64-netinst.iso \
    boot.priority=1
lxc config set \
    fuss-server security.secureboot=false
The options boot.priority=1 and
security.secureboot=false are needed to make sure that we
actually boot the system from this iso.
lxc config device show fuss-server
lxc config show fuss-server | less
3.1.1. Install the server
Let’s start the fuss-server VM:
lxc start fuss-server --console=vgaThrough Xpra, the console of the virtual machine will be displayed on our laptop. The VM will boot from the iso that we downloaded, and we can follow the installation steps. This section of the FUSS docs has more details about the selections during installation: https://fuss-tech-guide.readthedocs.io/it/latest/quick-install.html#configurazioni-iniziali
After finishing the installation, we should remove the cdrom device from the VM and start it again:
lxc stop -f fuss-server
lxc config device rm fuss-server cdrom
lxc config device show fuss-server

lxc start fuss-server
lxc console fuss-server --type=vga
3.1.2. Install the lxd-agent
wget https://t.ly/QCLN -O install-lxd-agent.sh
less install-lxd-agent.sh
chmod +x install-lxd-agent.sh
./install-lxd-agent.sh
See this section for more details.
3.2. Setup LAN1 interface
Append these lines to /etc/network/interfaces:
cat <<EOF >> /etc/network/interfaces

# LAN1
allow-hotplug enp6s0
iface enp6s0 inet static
      address 192.168.0.1
      netmask 255.255.255.0
      network 192.168.0.0

EOF
Then activate this interface:
ip addr
ifup enp6s0
ip addr
3.3. Install fuss-server
The custom package fuss-server contains the scripts that are needed
to do the installation and configuration of the server.
First of all, append these line to /etc/apt/sources.list:
cat <<EOF >> /etc/apt/sources.list

deb http://deb.debian.org/debian/ bookworm-backports main
deb [signed-by=/usr/share/keyrings/fuss-keyring.gpg] http://archive.fuss.bz.it/ bookworm main

EOF
Then add the key:
apt install gnupg
wget -qO \
    /usr/share/keyrings/fuss-keyring.gpg \
    https://archive.fuss.bz.it/apt.gpg
Finally install the package:
apt update
apt install fuss-server
3.4. Configuration
fuss-server --help
fuss-server configure
cat /etc/fuss-server/fuss-server.yaml
fuss-server create
The create command will run the Ansible scripts that are needed to
install and configure the rest of the system.
For more explanations and details see: https://fuss-tech-guide.readthedocs.io/it/latest/server/configurazione_server.html#configurazione-fuss-server
4. Install a FUSS client
We are going to install first the latest version of the Debian 12 Xfce live ISO, which can be downloaded from here: https://cdimage.debian.org/mirror/cdimage/release/current-live/amd64/iso-hybrid/
debarchive="https://cdimage.debian.org"
path="mirror/cdimage/release/current-live/amd64/iso-hybrid"
wget "$debarchive/$path/debian-live-12.1.0-amd64-xfce.iso"
More details about how to install a client are available at the technician’s manual.
4.1. Create a VM
Create an empty VM, connected to LAN1:
lxc init client1 \
    --empty --vm \
    --network=LAN1 \
    -d root,size=40GB \
    -c limits.memory=2GB \
    -c limits.cpu=2
Attach the iso file as a device of type disk, and make it the first boot option. Disable also secureboot:
lxc config device add client1 cdrom \
    disk source=$(pwd)/debian-live-12.1.0-amd64-xfce.iso \
    boot.priority=1
lxc config set client1 security.secureboot=false
Check its config:
lxc config device show client1
lxc config show client1 | less
4.2. Install it
Start it with a VGA console:
lxc start client1 --console=vgaComplete the installation.
During the installation, use http://proxy:8080 as HTTP Proxy,
because this client is on the LAN behind the FUSS server, and the
server has installed squid and uses it as a proxy.
|
Stop the client, remove the iso device, and start it again:
lxc stop -f client1
lxc config device remove client1 cdrom
lxc config device show client1
lxc start client1
lxc console client1 --type=vga
Login as root and install the LXD agent:
scp root@192.168.0.1:install-lxd-agent.sh .
less install-lxd-agent.sh
chmod +x install-lxd-agent.sh
./install-lxd-agent.sh
We are using scp to copy install-lxd-agent.sh from the
server because right now it is difficult to download it from the web
with wget. This is because of the squid proxy that is running on the
server, which refuses unauthorized connections.
|
4.3. Install fuss-client
lxc exec client1 -- bash

cat <<EOF >> /etc/apt/sources.list

deb [signed-by=/usr/share/keyrings/fuss-keyring.gpg] http://archive.fuss.bz.it/ bookworm main
deb http://httpredir.debian.org/debian bookworm-backports main

EOF

apt install wget
export http_proxy=http://proxy:8080
export https_proxy=http://proxy:8080
wget -qO /usr/share/keyrings/fuss-keyring.gpg https://archive.fuss.bz.it/apt.gpg

apt update

cat <<EOF >> /etc/apt/apt.conf.d/no-bookworm-firmware.conf
APT::Get::Update::SourceListWarnings::NonFreeFirmware "false";
EOF

apt update
apt upgrade
apt dist-upgrade

apt install fuss-client
apt install systemd-timesyncd screen
4.4. Client configuration
Configuration of the client is done with the command fuss-client:
fuss-client --helpHowever, before starting the configuration, we need to know in which
cluster/group of computers this client belongs to. Actually we haven’t
defined yet any clusters. One way for doing it is through the Octonet
web interface. Open in browser http://proxy:13402 and login with
username root and the master password defined on the configuration
of the server (it is not the password of the root account on the
server). Then click on "Managed Hosts" on the right, click on "Managed
Hosts" on the top, and select "Create new cluster" from the menu.
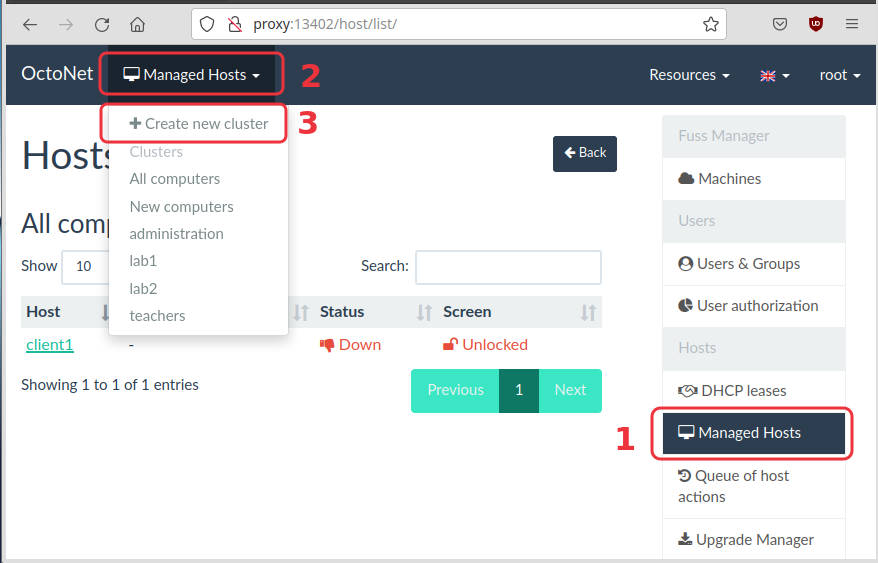
Let’s say that the name of this cluster is lab1. Now we can setup
the client like this:
fuss-client -a -g lab1 -H client1 --lightThe option -a is for adding a new client. The option -g
is for the group/cluster of computers where this client belongs to.
The option -H sets the hostname. The option --light will
make a basic installation; without this option lots of educationsl
programs will be installed (and right now we don’t want to do it,
since we are just testing).
4.5. Fix the screen resolution
Let’s also fix the screen resolution of the client (because it gets automatically a very big resolution):
sed -i /etc/fuss-client/display-setup-script/setDisplayResolution \
    -e 's/autorandr/#autorandr/'
sed -i /etc/fuss-client/display-setup-script/setDisplayResolution \
-e '/#autorandr/a xrandr -s 1280x800'| This is needed only when testing with LXD VMs. When installation is done on a real machine, most probably this issue does not happen. |
5. Manage user accounts
User management is centralized, and it can be done from the web
interface of OctoNet, at http://proxy:13402/ . Login as root, using
the master password given during the configuration of the
fuss-server.
5.1. Add new users
Open the OctoNet interface (on http://proxy:13402/) and add a couple
of new users, for example user1 and user2.
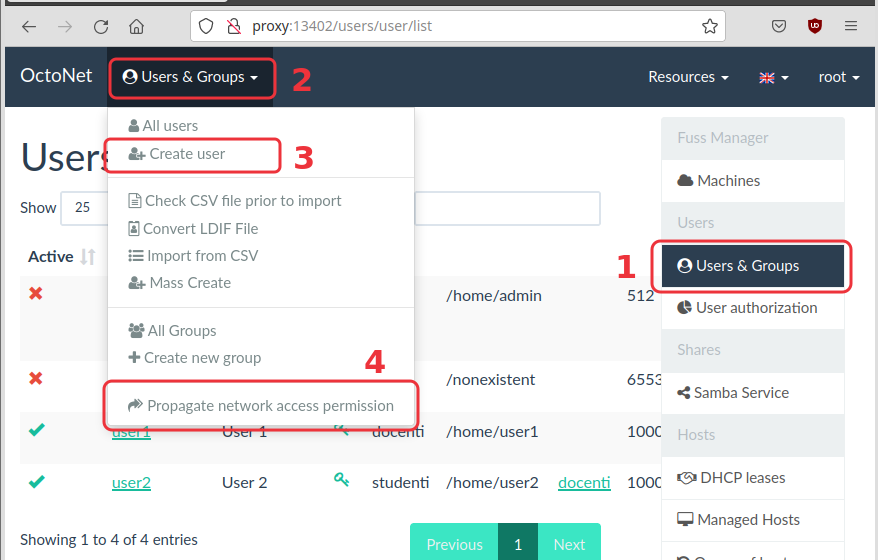
| Don’t forget to click the "Propagate" button, after creating the new users. |
Now restart the client and try to login with each of them:
lxc stop -f client1
lxc start client1 --console=vga
Note that when you try to open a web site, the proxy asks you to authenticate with a username and password. Use the same username and password that you used to login to your account.
5.2. Add users from CSV
Create a CSV file like this:
cat <<EOF > user-list.csv
User 001,user001,pass001,studenti
User 002,user002,pass002,studenti
User 003,user003,pass003,studenti
User 004,user004,pass004,studenti
User 005,user005,pass005,studenti
EOF
In this example, the first column is the full name, the second one is the username, the third one is the password, and the last column is the primary group. The order of the columns does not matter because it can be fixed during the import.
There is an option in the menu for checking the file before importing it. After the check you can start importing.
For more details about creating accounts from CSV files, look at the corresponding docs.
6. Using Clonezilla
6.1. Save a client image
To start Clonezilla on client1, we have to boot it from the LAN. We
need to disable secure boot and to set the network interface as the
first boot device:
lxc config set client1 security.secureboot=false
lxc config device show client1
lxc config device set client1 eth0 boot.priority=1
lxc config device show client1
lxc stop client1 --force
lxc start client1 --console=vga
In case the mouse is locked, press Shift_L + F12 to unlock it.
|
Now it will show the Clonezilla menu and you can save the image of the client on the server. For more details see this page.
After the image is saved, we can stop client1, remove the boot priority (that makes it boot from network), and start it again:
lxc stop client1 --force
lxc config device unset client1 eth0 boot.priority
lxc config device show client1
lxc start client1 --console=vga
6.2. Install a client from image
lxc init client2 \
    --empty --vm \
    --network=LAN1 \
    -d root,size=40GB \
    -c limits.memory=2GB \
    -c limits.cpu=2
lxc config set client2 security.secureboot=false
lxc config device set client2 eth0 boot.priority=1
lxc config device show client2

lxc start client2 --console=vga
7. Testing Captive Portal
7.1. Create a new virtual LAN
lxc network create LAN2 --type=bridge
lxc network list

lxc network show LAN2
lxc network unset LAN2 ipv4.address
lxc network unset LAN2 ipv4.nat
7.2. Attach the server to this LAN
lxc stop FUSS
lxc network attach LAN2 FUSS eth2 eth2
lxc start FUSS
lxc network show LAN2
7.3. Fix the configuration of the server
Unfortunately, when a new interface is attached to the virtual machine, the names of the existing interfaces change, so we need to fix the configuration of the server again.
lxc exec FUSS -- bash
ip addr
ip ro

vim /etc/network/interfaces
Edit /etc/network/interfaces so that it looks like this:
auto lo
iface lo inet loopback

auto enp7s0
iface enp7s0 inet dhcp

auto enp6s0
iface enp6s0 inet static
    address 192.168.1.1
    netmask 255.255.255.0

iface enp5s0 inet manual
Here enp5s0 is the new interface that will be used for the captive
portal.
We should also edit /etc/fuss-server/fuss-server.yaml and correct
the interfaces, like this:
external_ifaces:
- enp7s0
internal_ifaces:
- enp6s0
hotspot_iface: ''
hotspot_network: ''
Let’s restart the server:
exit
lxc stop FUSS
lxc start FUSS
Finally, let’s also re-run the configuration scripts and restart again:
lxc exec FUSS -- bash
fuss-server upgrade
exit
lxc stop FUSS
lxc start FUSS7.5. Test it with a client
Let’s create a VM that is connected to LAN2:
lxc init images:debian/10/cloud client3 \
    --vm --network=LAN2 \
    -c limits.memory=2GB -c limits.cpu=1
lxc config device override client3 root size=20GB
lxc start client3
lxc ls

lxc exec client3 -- bash
export http_proxy=http://proxy:8080
export https_proxy=http://proxy:8080
apt install tasksel
tasksel install desktop xfce-desktop
clear
exit
lxc stop client3
lxc start client3
# lxc console client3 --type=vga
8. Appendices
8.1. Connect to LXD remotely
We can connect to the LXD from a local machine, for example a laptop, and manage it remotely.
-
Install LXD on the local machine (without initializing it with
lxc init):apt install snapd snap install lxd --channel=latest/stable snap list lxc list -
Enable remote connection on the server:
lxc config set core.https_address "[::]" lxc config set core.trust_password some-password -
The port
8443on the server should be open as well:firewall-cmd --zone=public --add-port=8443/tcp --permanent firewall-cmd --reload firewall-cmd --zone=public --list-ports -
On the local machine add a remote, like this:
lxc remote add lxd1 11.12.13.14This will prompt you to confirm the remote server fingerprint and then ask you for the password.
-
Make it the default remote and test it:
lxc remote list
lxc remote switch lxd1
lxc remote list
lxc ls
Now all the
lxccommands on the laptop will be executed by default on the remote LXD server. -
Once we can connect remotely to the LXD server, we should unset
core.trust_passwordon the server, for security reasons:lxc config get core.trust_password lxc config set core.trust_password "" lxc config get core.trust_password -
On the client machine (laptop) install also
virt-viewer(orspice-client-gtk), which is needed to access the VGA console of the virtual machines:apt install virt-viewerBe aware that without Xpra, the GUI interface displayed by virt-vieweris not smooth but slow and lagish.
8.2. Setup Xpra
We can use Xpra in order to access the VGA console of a virtual machine remotely. We need to install it both on the server and on the client (on the laptop):
apt install xpraOn the server we also need to install the package virt-viewer (which
provides remote-viewer) and some other required packages:
apt install virt-viewer \
            tilix dbus-x11 python3-pil
Then we can start Xpra on the server, like this:
xpra start :7
DISPLAY=:7 tmux
Instead of 7 you can use any other port for the display.
|
From the client, we can attach to the Xpra server like this:
xpra attach ssh:user@example.com:7Now, from the tmux on the server we can start any GUI application,
and it will be displayed on the local machine.
8.3. Install FUSS server starting from image
Instead of installing debian from iso, we can start from a debian base image, which is quicker and more convenient.
8.3.1. Create a VM
lxc stop fuss-server

lxc init images:debian/10/cloud fuss-server-1 --vm \
    -c limits.memory=4GB -c limits.cpu=2
lxc config device override fuss-server-1 root size=60GB
lxc network attach LAN1 fuss-server-1 eth1 eth1
lxc network attach LAN2 fuss-server-1 eth2 eth2
lxc start fuss-server-1
lxc ls
The first time that it is started it takes longer than usual to come
up, because cloud-init does the necessary configurations (including
a resize of the partition and the filesystem).
8.3.2. Fix the network configuration
Let’s get a shell inside the VM in order to check and fix the network configuration:
lxc exec fuss-server-1 -- bash

ip addr
ip link
ip link set enp5s0 up
dhclient enp5s0
ip addr
ip ro
ping 8.8.8.8
ping google.com

# remove cloud-init
apt purge cloud-init
apt autoremove

mv /etc/network/interfaces.d/50-cloud-init /etc/network/interfaces
cat /etc/network/interfaces
# sed -i /etc/network/interfaces -e 's/enp5s0/enp7s0/'

# set a static IP to the LAN interface
cat << EOF > /etc/network/interfaces
auto lo
iface lo inet loopback

auto enp5s0
iface enp5s0 inet static
    address 10.92.186.150/8
    gateway 10.92.186.1
    dns-nameservers 8.8.8.8
    dns-search fusslab.al

auto enp6s0
iface enp6s0 inet static
    address 192.168.0.1/22
EOF

# restart to make sure that network configuration works
systemctl restart networking

ip addr
ip ro
ping 8.8.8.8
ping google.com
8.3.3. Install fuss-server
# install some dependencies
apt install wget gnupg2 ?nfs-common? python ansible

# add contrib and non-free package repos
#sed -i /etc/apt/sources.list -e 's/main/main contrib non-free/g'

# add the FUSS package repo
cat << EOF >> /etc/apt/sources.list
deb http://deb.debian.org/debian/ bookworm-backports main
deb [signed-by=/usr/share/keyrings/fuss-keyring.gpg] http://archive.fuss.bz.it/ bookworm main
EOF

wget -qO /usr/share/keyrings/fuss-keyring.gpg https://archive.fuss.bz.it/apt.gpg

apt update
apt install fuss-server
8.4. Install a proxmox VM
The "Quick installation guide" describes how to install a FUSS server inside a proxmox machine, starting from a preprocessed image. So, let’s try first to install proxmox on virtual machine.
8.4.1. Download the iso
wget 'https://www.proxmox.com/en/downloads?task=callelement&format=raw&item_id=655&element=f85c494b-2b32-4109-b8c1-083cca2b7db6&method=download&args[0]=3f74c696e0dd44b51a8f47bd9bc4f25d' \
    -O proxmox-ve_7.2-1.torrent
apt install aria2
aria2c proxmox-ve_7.2-1.torrent
8.4.2. Create a VM
lxc init proxmox --empty --vm \
    --network=lxdbr0 \
    -d root,size=200GB \
    -c limits.memory=24GB \
    -c limits.cpu=4
lxc config device add \
    proxmox cdrom disk \
    source=/root/proxmox-ve_7.2-1.iso \
    boot.priority=1
lxc config set proxmox \
    security.secureboot=false
lxc network attach LAN1 proxmox eth1 eth1
lxc network attach LAN2 proxmox eth2 eth2
lxc config device show proxmox
lxc config show proxmox | less
8.4.3. Install from iso
lxc start proxmox --console=vgaAfter the installation is finished, remove the CDROM and reboot:
lxc stop -f proxmox

lxc config device rm proxmox cdrom
lxc config device show proxmox

lxc start proxmox --console=vga
8.4.4. Install the lxd-agent
The VM that we just installed from an iso cannot be managed easily
with lxc commands — some functionality is not available. For
example we cannot do lxc exec main-server — bash to get a
shell inside the VM.
To fix this, we need to install lxd-agent inside the VM. The steps
are described in
this
post, but I have written this
snippet to facilitate the installation.
Login as root on the VGA console, and do:
wget https://t.ly/QCLN -O install-lxd-agent.sh
less install-lxd-agent.sh
chmod +x install-lxd-agent.sh
./install-lxd-agent.sh
rm install-lxd-agent.sh| For security reasons, don’t skip checking the content of the downloaded script, before running it. |
8.4.5. Update the system
First of all, get a shell inside the VM:
lxc exec proxmox -- bashAdjust network configuration
The network configuration that is performed by the Proxomox installer on the ISO image is still static, even when the IP address is obtained from a DHCP server. So, we have to make sure that this IP is outside the DHCP range, in order to avoid any IP conflicts in the future.
Edit /etc/network/interfaces and set a safe fixed IP, for
example 10.92.186.250:
apt install vim -y
vim /etc/network/interfaces
systemctl restart networking
ip addr show vmbr0
Adjust repositories
Edit /etc/apt/sources.list.d/pve-enterprise.list and comment
out the line that it contains:
# deb https://enterprise.proxmox.com/debian/pve bullseye pve-enterprise
Then we need to add the "community" repository:
echo 'deb http://download.proxmox.com/debian/pve bullseye pve-no-subscription' \
> /etc/apt/sources.list.d/pve-no-subscription.list8.4.6. Forward the port 8006
We can do this with the command lxc network forward:
lxc network forward --help
lxc network forward create \
    lxdbr0 132.180.52.45
lxc network forward port add \
    lxdbr0 132.180.52.45 \
    tcp 8006 10.92.186.250 8006
lxc network forward show \
    lxdbr0 132.180.52.45
Here 132.180.52.45 is the IP of the host, and 10.92.186.250
is the IP of the VM.
|
Now we can access the web interface of the proxmox server at https://132.180.52.45:8006/ .
8.4.7. Install FUSS server
| For more explanations and details see: https://fuss-tech-guide.readthedocs.io/it/latest/quick-install.html |
lxc exec proxmox -- bash
cd /var/lib/vz/dump/
wget http://iso.fuss.bz.it/cloud-init/vzdump-qemu-fuss-server-10-latest.vma.zst

qmrestore /var/lib/vz/dump/vzdump-qemu-fuss-server-10-latest.vma.zst \
    106 -storage local-lvm -unique

qm set 106 --ide2 local-lvm:cloudinit

qm set 106 --ipconfig0 ip=10.92.186.252/8,gw=10.92.186.1
qm set 106 --ipconfig1 ip=192.168.0.2/24
qm set 106 --searchdomain fusslab.blz
qm set 106 --nameserver 127.0.0.1
qm set 106 --sshkey ~/.ssh/id_rsa.pub

qm set 106 --name fuss-server

qm set 106 --memory 4096
qm set 106 --onboot 1
qm resize 106 scsi0 100G| For some reasons that I don’t understand, maybe related to the LXD virtual networks, or to the network configuration that I have done, the fuss-server cannot ping the gateway or access the Internet. This prevents any further testings with it. |
8.5. Install a client starting from an LXD image
8.5.1. Create a VM
We will start from a basic debian system that is created from an image (not installed from an iso).
lxc init images:debian/10/cloud client1 \
    --vm --network=LAN1 \
    -c limits.memory=2GB -c limits.cpu=1
lxc config device override client1 root size=30GB
lxc start client1
lxc ls
8.5.2. Install xfce-desktop
lxc exec client1 -- bash
export http_proxy=http://proxy:8080
export https_proxy=http://proxy:8080
apt install tasksel
tasksel --list-tasks
tasksel install desktop xfce-desktop
clear
exit
lxc stop client1
lxc start client1
# lxc console client1 --type=vga
8.5.3. Install fuss-client
lxc exec client1 -- bash
export http_proxy=http://proxy:8080
export https_proxy=http://proxy:8080

echo 'deb http://archive.fuss.bz.it/ bookworm main' \
    > /etc/apt/sources.list.d/archive_fuss_bz_it.list
cat /etc/apt/sources.list.d/archive_fuss_bz_it.list
apt install wget
wget -qO /usr/share/keyrings/fuss-keyring.gpg https://archive.fuss.bz.it/apt.gpg
# wget -qO - https://archive.fuss.bz.it/apt.key | apt-key add -
apt update
apt install fuss-client
fuss-client --help

apt install python cups-browsed
# fuss-client -H client1 -a
# fuss-client -H client1 -a --light
fuss-client -a