Building SSH Tunnels
Table of Contents
- 1. Bypass a firewall blocking
- 2. Connect to a database behind a firewall
- 3. Access a local machine from internet
- 4. Connect two computers with private IPs
- 5. Accessing a local computer on a remote LAN
- 6. Make connections more convenient and secure with public-private keys
- 7. Automate things with Docker and shell scripts
- 8. Referencies
The Secure SHell (ssh) is normally used for remote login to another system. However it is a flexible and powerful tool that can be used for many other interesting things as well. One of them is port forwarding (also known as ssh tunneling) between the client and the server machine. Althought there are lots of tutorials out there, I always find it a bit confusing how to use it properly. So, I am writting yet another tutorial about ssh tunneling, based on use cases and examples, hoping to make its usage clear to myself and to the others.
1 Bypass a firewall blocking
Suppose that a certain website (for example twitter.com, or in our
example remote.com) is blocked by a firewall, which does not allow
us to open it in browser. Let's also say that we have ssh access to
a server (that I will call proxy.com) somewhere on the internet, on
the other side of the firewall. This means that we can login to this
server with a command like ssh user@proxy.com (and with the user's
password). In such a situation we can bypass the firewall with a
command like this:
ssh user@proxy.com -L 8000:remote.com:80
This situation is presented in the following diagram:
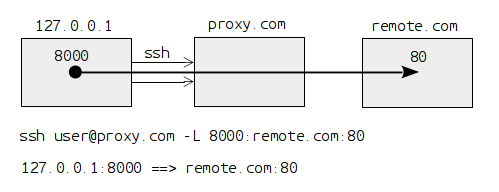
Figure 1: Bypassing a firewall block.
In this case we are forwarding the port 8000 on our local machine to
the port 80 on the server remote.com, through the server
proxy.com. This means that if we open 127.0.0.1:8000 in browser,
this request will be sent to remote.com:80 through proxy.com and
we will get the reply in the browser.
As far as remote.com is concerned, the request seems to come from
proxy.com. The firewall (which blocks the website remote.com) sees
only ssh traffic between our machine and proxy.com. It has no clue
about the HTTP traffic because it is encapsulated inside the SSH
traffic, and the SSH communication is encrypted.
You can see why it is called a tunnel: because the traffic is hidden inside the SSH traffic, and because it can be used to bypass the network gatekeepers and checkpoints.
Note: The situation when a webside is blocked can be solved by other means as well, for example using a Tor browser. However it serves as a good example for explaining ssh tunneling and how it works.
2 Connect to a database behind a firewall
Suppose that we have a webserver and a database server on the remote
server example.com. Usually a database is configured to be accessed
only from the localhost, but we would like to access it remotely from
our local machine (in order to use a GUI management tool, for
example). We can solve this situation by making a SSH port forwarding
with a command like this:
ssh user@example.com -L 9000:localhost:3306
This situation is presented in the following diagram:
Figure 2: Connect to a DB behind a firewall
Now we can use the pot 9000 on our local machine to connect to the
database server. Behind the scene it will be actually forwarded to
the port 3306 on the server example.com. As an added benefit, the
communication be encrypted and secure, even if the database server
itself does not support secure communication, because all the traffic
is encapsulated inside the SSH protocol.
About the option -L 9000:localhost:3306, here localhost means the
local host after we have logged in to the server example.com. So,
it actually referes to the server example.com, not to our local
machine. Since we are using the option -L, then the port 9000 in
our local machine is forwarded to the port 3306 on the remote
machine (in this case example.com itself).
One way of thinking about it is that with the option -L the port
forwarding is in the same direction as the ssh connection itself: from
our local machine to the remote server. In the next section we will
see the option -R which makes the port forwarding in the reverse
direction compared to the ssh connection.
3 Access a local machine from internet
Suppose that we are developing a Ruby-on-Rails application in our local machine and we want to show it to someone else on the internet. Normally this is not possible because our machine does not have a public IP that can be accessed remotely. However we can fix this if we have ssh access to a server with public IP, somewhere on the cloud. We can use a ssh command like this:
ssh user@example.com -R 9000:localhost:3000
This situation is presented in the following diagram:
Figure 3: Accessing a local machine from internet.
Since the option -R is used, port forwarding is in the reverse
direction of the ssh connection, which means from the remote server to
the local machine. Hence, 9000 is the port on example.com and
3000 is the port on our local machine. The result of this port
forwarding is that whenever somebody tries to connect to
example.com:9000 they will actually be connected to 127.0.0.1:3000
on our local machine.
Note: In order for the reverse port forwarding to work, it has to be
enabled on the sshd configuration of example.com. It is not
enabled by default because it may become a security problem. To enable
it we have to add the line GatewayPorts yes on
/etc/ssh/sshd_config, and then we have to restart the sshd service:
service sshd restart.
4 Connect two computers with private IPs
The following diagram shows the connection between two computers with private IPs, with the help of a proxy server that has a public IP:
Figure 4: Connecting two computers with private IPs
Since none of the local computers has a public IP (and usually each of them is behind a firewall) they cannot contact each-other directly. However, with the help of a proxy server which is accessible from both of them, they can establish a port forwarding between them and communicate securely.
The first local computer can forward its local port 5901 to the port
5933 on proxy.com, like this:
ssh user@proxy.com -L 5901:localhost:5933
Then the second local computer can forward the port 5933 on proxy.com
to its local port 5901, like this:
ssh user@proxy.com -R 5933:localhost:5901
The net effect of of these two connections is that the port 5901 of
the first local host is forwarded to the port 5901 of the second
host, and when an application tries to connect to port 5901 on the
first machine it will actually be connected to the port 5901 of the
second machine.
By the way, the port 5901 is usually use by VNC, and this connection
enables a vnc client on the first machine to access a vnc server on
the second machine. It has the added benefit of a secure connection,
because the VNC protocol is a bit old and does not support encryption,
but the traffic is done inside a ssh tunnel, and this makes it secure.
Any other protocol can be tunneled, instead of the VNC protocol. It is perfectly possible to tunnel the SSH protocol as well, inside a ssh tunnel. For example, if we run these commands:
(1)  ssh user@proxy.com -L 22:localhost:5327
(2)  ssh user@proxy.com -R 5327:localhost:22
Then by running the command ssh abc@127.0.0.1 on the first machine,
we will be able to access the account abc on the second
machine. This assumes that we don't have a sshd server running on
port 22 on the first machine, otherwise we would have a port
conflict. But in such a case we could forward the port 2201 (for
example) to port 22 and then access it like this: ssh -p 2201
abc@127.0.0.1.
5 Accessing a local computer on a remote LAN
It is also possible to use the second machine as a gateway for accessing another local computer on its LAN, as shown in this diagram:
Figure 5: Accessing a local computer on a remote LAN.
The commands in this case are like this:
(1)  ssh user@proxy.com -L 2201:localhost:5327
(2)  ssh user@proxy.com -R 5327:local3:22
On the second command we can give the name or the IP of the internal
machine that we want to expose. Then we can connect to it from the first
machine with a command like this: ssh -p 2201 abc@127.0.0.1.
6 Make connections more convenient and secure with public-private keys
Whenever we create a tunnel, we also get a ssh shell on the proxy
server. Usually this is not needed because all that we want is to
forward a port and to create a tunnel. To avoid this, we can rush the
ssh command with the flags -nNT wich will tell ssh to not allocate a
tty. The command will look like this:
ssh -nNT user@proxy.com -L 2201:localhost:5327
Besides this, it is more convenient and secure to establish the ssh connection with public-private keys, instead of using passwords.
7 Automate things with Docker and shell scripts
8 Referencies
- https://chamibuddhika.wordpress.com/2012/03/21/ssh-tunnelling-explained/
- https://www.ssh.com/ssh/tunneling/example
- http://blog.trackets.com/2014/05/17/ssh-tunnel-local-and-remote-port-forwarding-explained-with-examples.html
- http://dashohoxha.fs.al/remote-desktop-support-with-vnc/
- https://github.com/docker-build/p2p
- https://github.com/docker-build/sshtunnels